Vision Mark 2, the parts.

wing tip back ,
wing tip front ,
reinforcement ,
top ,
centre tunnel 1 ,
centre tunnel 2
Click on the text. Doesn't it work ??? Update the browser to 4.0 .

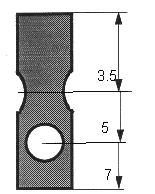
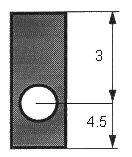
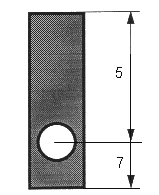
The connectors from reinforced vinyl tube.
 |
 |
 |
| 1 x connector to hold the mast and the spread. Drill 10 mm hole at 3.5 and at 5 cm |
4 x connector to hold wing tip spread and upper spread. Drill 10 mm hole at 3 cm. |
2 x connector to hold the spread. Drill 10 mm hole at 5 cm. |
SIZES in cm, inside diameter tube 10 mm.

The assembled left wing.
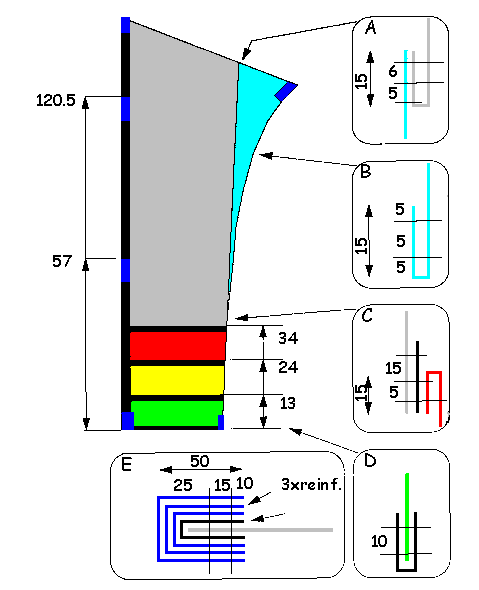
The dacron frame tunnel is 150 cm long. Add extra dacron as reinforcement at the top
(15 cm folded back to the outside) and bottom (10 cm folded back to the inside) of the frame tunnel.
 |
Meaning of colors:
Dacron side frame tunnel with 3 layers of 10 cm wide dacron. The upper is 10 cm and the lower is 15 cm long. See box E. |
Sew a loop of several layers of black nylon at the bottom wing tip. The loop must be bigg enough to keep a 6 mm splitcap. Finally sew the elastic webbing in the side frame tunnel. This may need some testing because the elastic webbing must keep (press with force) the side frame in the tunnel. Sew several times. See photo.

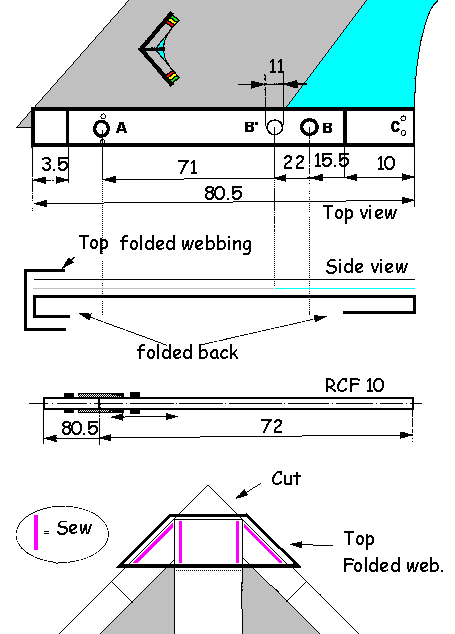
The centre tunnel (back of kite).
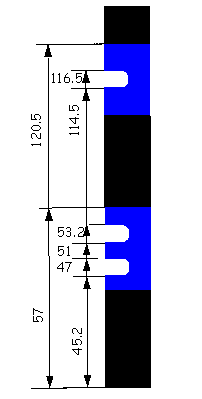
- Make the centre tunnel as a sandwich of dacron (front kite), the wings with side frame tunnel (middle) and seatbeld webbing (back kite). The seatbeld webbing is folded back and forms pockets for the centre frame. For a clean look flip the dacron over the nylon at the bottom (C). See side view. Sew at 0.5 cm of the dacron (or seatbelt webbings) edge. Sew the edge several times at the pockets.
- Cut the top of the wings of (see bottom drawing). Fold 15 cm of seatbelt webbing and make a top cap for the kite. The top cap also closes the side frame tunnels. For a clean look add first an extra layer of dacron (10 cm wide, folded) before the folded seatbeld webbing. Your sewing machine could now face some difficulties with all these layers of dacron and seatbelt webbing. I used the machine but hand powered it instead.
- Make a hole at A + B and reinforce it with a metal (punch ?) eye. The bridle is connected to the
centre frame through these reinforced holes.
Make a 17 mm (not 11 mm) hole at B' for the "+" connector.
Burn 2 little holes with a hot nail at A and C (2 cm from end).
These are used to attach the backside bridle to. See photo. - It is not possible to get the centre frame tube in the pockets. Thus the 80.5 cm RCF frame tube is cut at 72 cm. Glue parts 2 cm of 8x6mm RCF at each end of the frame tube (4x) as reinforcemnt. Cut the top of 1 soft vinyl endcap and then cut it in 2 parts. Slide the parts over the centre frame parts. Do the same with the brass connector. Slide 2 soft vinyl endcaps over the centre frame ends. By sliding the brass connector and the cut vinyl endcap over the centre frame you can get the frame in the pockets. Don't forget the connector to hold the spread and the mast.
