wing tip spread ,
mast ,
mast ,
centre frame ,
back bridle ,

Vision Mark 2, frame & bridle.

front bridle ,
front bridle ,
front & back ,
A ,
B ,
front bridle ,
clip & markers ,
D & E connector ,
hanging on the ceiling 1 ,
2 ,
3.
Click on the text. Doesn't it work ??? Update the browser to 4.0 .
The frame:
- Glue 2 soft vinyl endcaps to the ends of the upper spread (51 cm RCF 6x4 mm).
- Glue 1 soft vinyl endcap to 1 end of the wing spreads (2 x 57 cm RCF 6x4 mm).
- Glue 1 hard splitcap to 1 end of
the wing spreads (2 x 57 cm RCF 6x4 mm).
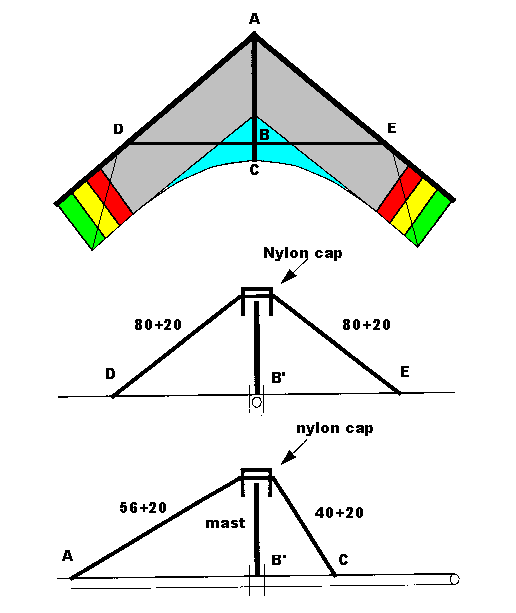
Back side bridle.
You will find the letter A, B and C also in the drawings of the parts.
D and E are the spread connectors.
Make 2 loops of 20 cm (back) and connect them to the spread connector D and E.
Make 1 loop of 20 cm using the burned holes in the centre tunnel at
A and do the same at C.
Put the
mast in the spread connector
at B'. Drill 2 holes in the nylon cap. Stretch lines from A to C via the holes in the nylon cap and
from D to E via the holes in the nylon cap. Put knots close to the nylon cap to fix its
position. Look at the photo and see that these lines are really streched but they don't deform the kite.
Front side bridle.
The black squares are normal knots. Sizes are measured when bridle is ready.
Make the first bridle with clip 2 times.
Check photos:
A ,
B ,
bridle ,
clip ,
D & E connector ,
hanging on the ceiling 1 ,
2 ,
3.
