ASSEMBLY MANUAL – page 1
Grand-Son of Woodstock
I created a manual to send along with the “Grand-Son of Woodstock II at Billings, MT”
I believe that an edited version of that manual will be helpful here because it shows actual photos of the kite in various stages of assembly. Due to this kites complexity, the partially assembled kite pictures will enhance my poor sketches and notes. It will also give you a stick marking system that if you use it will greatly expedite assembly and increase the odds considerably that you can put the correct sticks at the correct places the first time, and not be embarrassed by your incompetence to spectators that surely will gather every time you put it together in the field. I marked my sticks with colored heat shrink tubing, or colored electrical tape. In addition, it follows the axiom that a picture is worth a thousand words...
|
|
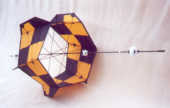

1. Find the center two 3/4” tinkertoys on the spine, and using the 12 short .09 cross sticks assemble the center checkerboard rotator. Tip: insert stick thru hole & into pocket first and then last into tinkertoy. Kite should look like photo #1
2. Slide the large rotator over top of the assembled small rotator & spine from step 1. Using the long .125 hollow cross sticks and the 1” tinkertoys assemble the large rotator as above. Kite should look like photo #2.
|
|
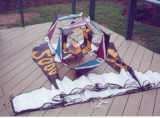
3. Insert spine with rotators attached into center of kite body with end marked with white band towards the front (white Woodstock end), and end marked with red & blue band towards the back or tail end. Kite should look like photo #3A. A helper would be good here to relieve longeron pressure at the back of the kite. Install stick marked with 2 white bands and one green band on the bottom of the front tinkertoy (TT has cross marks on it designating the top) down to the pusher on the lower longeron. Then insert the two sticks marked with 1 white band in TT hole 120 degrees off bottom on each side to front wing adjustable fitting. Kite should look like photo #3B.
|
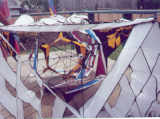
4. At the back of the kite, install the stick marked with 1 each red, green, blue band on the bottom of the TT (once again the top is marked with cross cuts) to the pusher on the bottom longeron. The rear wing sticks are two part sticks, the one without the ferrel marked with one band goes in first and then the stick with the ferrel marked with two bands goes on the bottom into the tinkertoy; therefore, install stick marked with 1 blue band to the blue side and the stick marked with 1 red band to the purple side thru the wing sleeve and into the rear wing adjuster; then install the stick with 2 blue bands on the blue side 120 degrees off bottom of TT and the 2 red band stick on the purple side. Kite should look like photo #4