This kite uses a horizontal spar with 2 standoffs and a corresponding line
tensioner on each side of the vertical center spline. This gives the top wing a
return angle from the initial dihedrhal angle from the spline. I like the shape
this creates in the sky.
I originally used this rigging configuration on a modified cross
deck.
There are a number of variations to the configuration I would like
to try; maybe next summer. These variations are mentioned at the end of this
plan.
The materials needed for construction include:
Ripstop nylon, 3/4 oz. --
6 yds @ 40 in. wide
Fiberglass tubing, .505" dia. -- 2 pcs x 54"
lg.
Fiberglass tubing, .317" dia. -- 3 pcs x 39 1/2" lg.
Fiberglass
tubing, .248" dia. -- 4 pcs x 32 1/2" lg.
Graphite tubing, .188" dia. -- 7
pcs x 32 1/2" lg.
Misc. -- arrow nocks, Fg rod for internal ferrules, barrel
beads, 1/2" dia. metal slip rings, and 20+ ft. of line for the bridle and some
of the connection points.

I show 2 options for creating the sleeves for the wing tip spreaders. The use
of either would probably be dependent of the graphics you have planned. Option
#1 is sewing a hemmed strip with the ends open over the base fabric. Option #2
involves joining 2 separate pieces of fabric together with a folded over seam.
The wide fold creates the sleeve for the fiberglass tube spreader.
I can not sew folded over hems on curved edges that look decent. Have always
liked using black, double folded bias tape for these curved edges. This black
bias tape also "outlines" the kite in the sky plus I don't need to add hem
allowances to the panel patterns. This is your preference......
Before the panel cutting and sewing steps would be the planning of the graphics or panel colors. As suggested in the Kite Plan Index, this planning could use Paint Shop Pro or Windows Paintbrush.
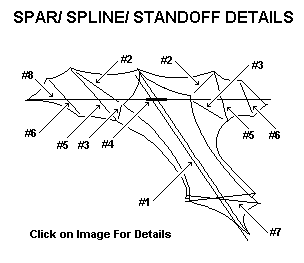
| ITEM | QTY | DESCRIPTION |
|---|---|---|
| #1 | 1 | .317" dia. x ~83" lg. fg tubing w/ arrow nock on one end & internal ferrule of 1/4" dia. fg rod or tubing |
| #2 | 2 | .188" dia. x ~27 1/2"" lg. graphite tubing . An option would be to use .248" dia fg tubing |
| #3 | 2 | .188" dia. x ~30" lg. graphite tubing. |
| #4 | 1 | .505" dia. x 12" lg. fg tubing. |
| #5 | 2 | .248" dia. x ~26" lg. fiberglass tubing w/ arrow nocks on both ends. |
| #6 | 2 | .248" dia. x ~22" lg. fiberglass tubing w/ arrow nocks on both ends. |
| #7 | 2 | .188" dia. x ~36" lg. graphite tubing w/ arrow nock on one end. |
| #8 | 2 | .505" dia. x 43" lg. fiberglass tubing w/ arrow nock on one end, an internal ferrule and a line tensioner. |
| Determine exact lengths at time of rigging. |
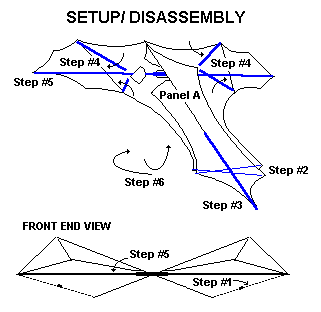
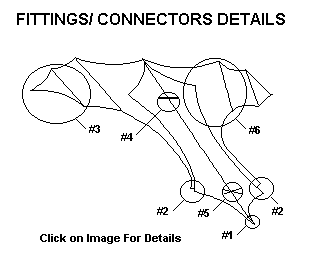
Setup requires 1) installing the bottom half of the spline #1, 2) connecting
the standoffs #2 & #3 into the bottom wing connectors on both sides, 3) and
installing the horizontal spars #8 with the spacer #4 for the top & then
adjusting the 2 line tensioners. The setup of the bottom involves installing the
2 cross spars #7 and adjusting the line tensioner to hold the bottom open.
The adjustment of the 2 top line tensioners does need some care that they are
set at an equal length. Not adjusted equally will make the return angle of the
top wing to be "lopsided". You will notice this being a problem when launching
and the kite continuously drops off to the side.
The use of the tail in higher winds speeds is recommended.
Here are some thoughts for some possible changes in the confiuration of the kite as shown in these plans. Some of these I have tried, most of them I haven't.
As is usually the case, probably most of these ideas won't have any
significant impact of flying characteristics, but it is always interesting to
check them out.