ANGLED WING II - SEWING DETAILS

SPREADER SLEEVE OPTIONS
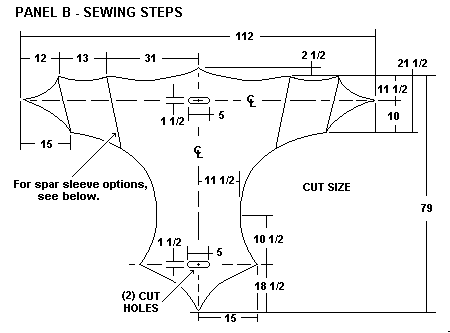
To make sleeves for the spreaders, #5
& #6, near the ends of both wings, you could either:
A) Sew panels in
place over Panel B.
or
B) Use the natural fold created when joining
separate pieces of fabric together when using a folded butt joint seam.
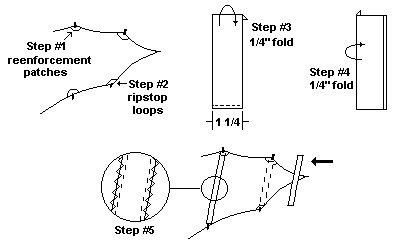 SEWN PANELS
Step #1: Add reenforcement patches. Spray mount material
to hold in place or use adhesive backed fabric & then sew in place.
Step
#2: Sew in place ripstop loops.
Step #3: Cut sleeve panels, fold top/ bottom
for hemming & sew these edges,
Step #4: Fold sides and hold in position
with spray mount.
Step #5: Position on Panel B and finish with straight &
zig zag stitches.
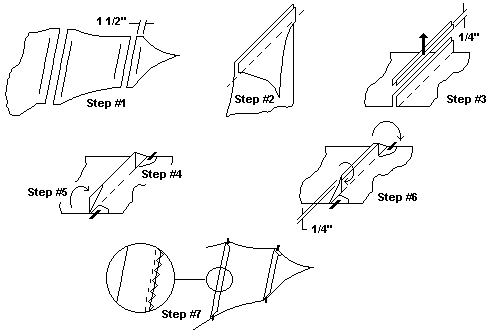 FOLDED FABRIC JOINT
Probably would use this type joint seam either
because a joint is needed anyway with the fabric width used or you are using
diofferent fabric pieces for the graphics.
Step #1: Cut wing panels with 1 1/2" extra fabric on each side.
Step #2:
Hold adjacent panel pieces together as shown and straight stitch
together.
Step #3: Trim 1/4" off end to provide straight and uniform
pieces.
Step #4: Fold over each end of the sleeve at an angle and sew in
place. This creates a hem at the ends of the sleeve.
Step #5: Sew in place
reenforcement pieces and ripstop loops.
Step #6: Fold over the top 1/4" and
fold the entire sleeve flat.
Step #7: Pulling each side flat, stitch &
then zig zag stitch to finish.
The above steps "read" complicated, but after the first time or two, it is
done a second nature.


