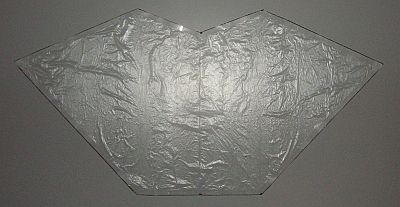
How To Make A Sled Kite

Instructions For The MBK Skewer Sled Kite

The instructions on how to make a sled kite might look awfully long, but that's because they are so detailed.

For those who like pictures, every detail is illustrated with photographs too. Just quickly work your way through from top to bottom, skimming over any detail that you don't need.


The MBK Skewer Sled Kite is a small sled 29 cm tall, with twin tails and a shallow V cut into the leading edge. If you imagine a kite taking off from the ground, the leading edge is the top edge of the sail. The Skewer Sled is a nice light wind flier.

Now's the time to read up on kite materials and other things needed for building a sled kite, if you haven't already.


How To Make A Sled Kite - Spars

How to make a sled kite - spars


  • select 2 skewers that are reasonably straight - check by rolling them on the table top
  • snip the points off, then check to see that both skewers are exactly the same length


How To Make A Sled Kite - Sail

How to make a sled kite - template


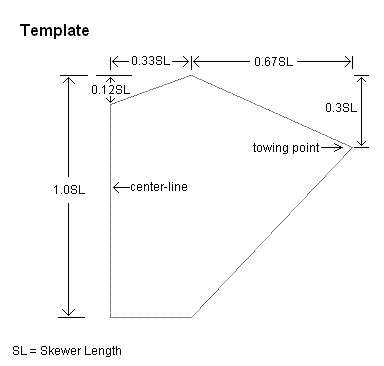
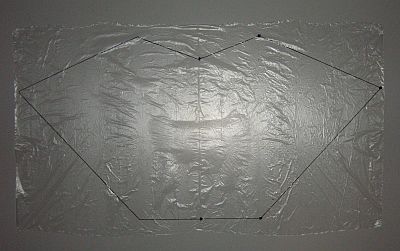
The template shown above represents one side of the kite sail. You will now transfer these measurements to the sail plastic as follows...

How to make a sled kite - corners


  • firstly, take the freezer bag that you will be using for the sail, and lay it flat on the table
  • mark the corners of the template shape with dots, as shown in the photo - notice that marks are also made on the side edge of the bag, which is the center-line of the kite sail
  • using the marking pen, rule lines between the dots

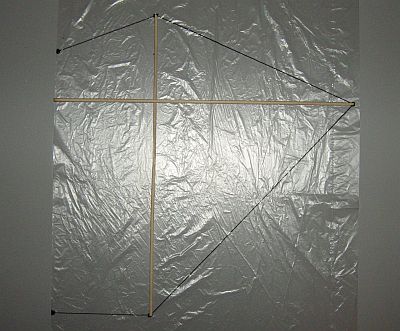
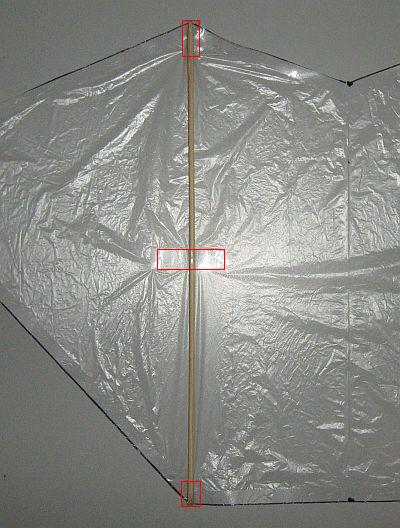
Note: Notice how laying the 2 spars on the plastic makes this process much easier! You don't have to do as much measuring with a ruler.


How to make a sled kite - sail edges 1


  • flip the plastic bag over, and trace over all the black lines using your marker pen and ruler
  • cut out a rectangular section of the bag containing the kite sail, open it out and lay it flat on the table - you can now see the complete sail outline, as in the photo


How to make a sled kite - sail edges 2


  • lay clear sticking tape along all the lines with each line showing through the center of the tape - that's 7 pieces of tape in all, if you do the trailing edge with a single piece of tape
  • with scissors, cut along the black lines - this will leave half the width of the sticking tape inside the sail outline

Note: Don't worry about overlapping lengths of tape at the corners, it will all look tidier after the cutting is done.


How to make a sled kite - spar taped down


The tape is hard to see, so the red rectangles indicate where the pieces are.

  • Place the left spar over the plastic, with the edge tape facing up
  • Cap the ends of the spar with tape, as in the photo, by sticking it down over the bamboo and plastic then folding it under the plastic to stick on the other side - a bit tricky, take your time!
  • Next, lay a short length of tape across the bamboo and onto the plastic, at the center - as in the photo
  • If you want to, trim the bits of tape that stick out at the top and bottom of the spar, with scissors

Now, tape the right hand spar in exactly the same way.


Here's how to reinforce the towing points...

How to make a sled kite - towing point


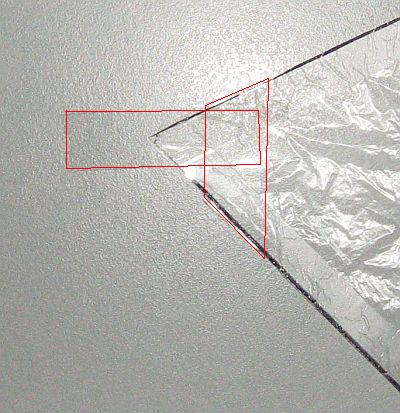
Again, the tape is hard to see, so the red lines indicate where the pieces are.

  • Firstly, stick down a length of tape that goes left to right and sticks out some distance from the towing point, as in the photo
  • Turn the sail over and stick down another piece of tape exactly the same way, so both pieces stick to the plastic at one end and to each other at the other end
  • Wrap another piece of tape around the towing point, in a vertical direction, as in the photo

Now go over to the right side of the sail and do exactly the same thing with another 3 pieces of tape. The pieces of tape that stick out are where you will attach the bridle line. This method is surprisingly strong and can take a lot of punishment in rough air, due to the kite's light pulling force.


How To Make A Sled Kite - Bridle

How to make a sled kite - bridle knots


  • Cut off some flying line to a length of 6 skewers. Tie one end to one towing point tape, and the other end to the other towing point tape. The trick is to use 2 or 3 half-hitches, then slide them down really tight onto the tape, crushing it. I found my thumbnail was helpful for doing this! Use a tiny dob of glue on the knots if you want to, to prevent them coming loose.
  • Take the bridle line and suspend the kite from it, so that the 2 sides line up exactly. The 2 spars should be right next to each other. Tie a big overhand loop into the bridle, taking care that the kite sides still align.
  • Stretch out the loop you just tied and put a second knot into it. See the photo. The flying line will be attached between the 2 knots.


How To Make A Sled Kite - Attaching Tails

How to make a sled kite - tails


Have you read the page on making kite tails? Assuming you have...

  • Make up a tail from a large freezer bag, making sure it is at least 3 times as long as the sled kite itself
  • Attach the tail by poking one end between the bottom of a spar and the sail
  • Pull the rest of the tail through the loop, but don't over-tighten
  • In the same way, make up and attach another tail to the other spar

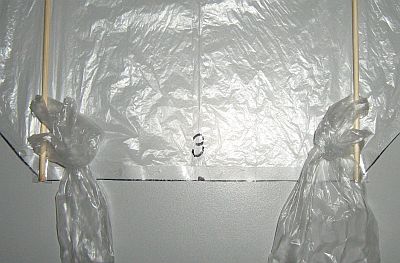
See the photo, where I have left the tails a bit loose to make it clear. And yes, this single-skewer sled is number 3 that I have made!

At this point, you've pretty much finished making the skewer sled!


How To Make A Sled Kite - Preparing To Fly

How to make a sled kite - attach line


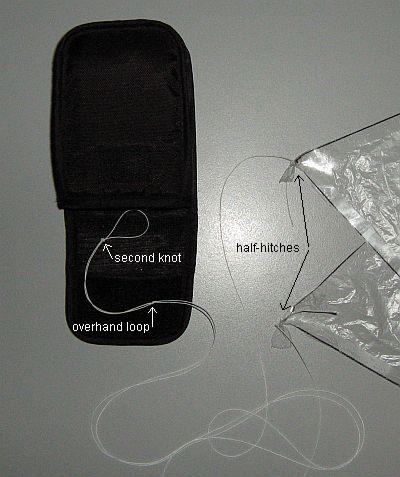
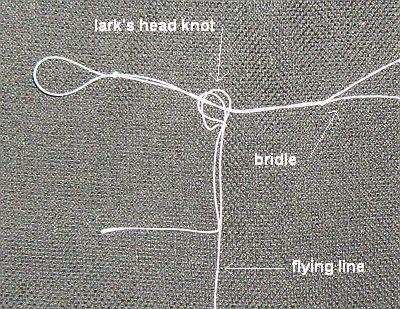
Finally, make up a flying line and attach it to the bridle with a Lark's Head knot. See the photo above.


How To Make A Sled Kite - Flying!

Assuming there is some breeze outside, just dangle the kite at arm's length until the wind catches it. As long as you feel the kite pulling, let out line slowly by letting it slip through your fingers.

Another approach is to get a helper to hold the kite up and let it go, with maybe 10 or 20 meters of line let out. This way, the kite soon gets high enough to make it easy to let more line out.

How to make a sled kite - launching


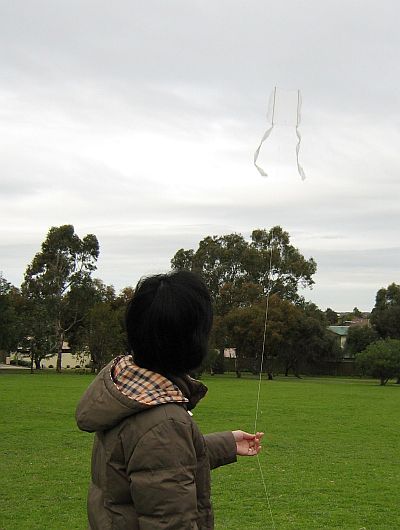
Here's a picture of the MBK Skewer Sled Kite number 3 being launched by my wife May, down at a local reserve. Aren, 2 1/2, is helping out by holding the winder.

Have fun flying, and I hope you've enjoyed learning how to how to make a Sled kite.

All the above info, plus much more is available in a PDF eBook which covers the entire 1-skewer series of kites.


Last updated: 10 Sep 2008


Return to How To Make A Kite from How To Make A Sled Kite

All the way back to Home Page


footer for how to make a sled kite page