 I
have tried to keep this plan as simple as possible, so everyone can build
it. If you are a more experienced kite builder you can build it in your
own way, using more advanced construction skills. This is one of the first kites I designed,
the original version dates back to 1985. The kite is based on the construction of
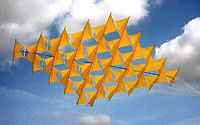
a Peter Lynn box, which I am sure you have seen once. In fact my
design sort of consists out of 25 Peter Lynn box cells (without the wings) sewn
together in an alternating pattern, to form one big kite. Scott Skinner commented in
the AKA magazine that impressive optical illusions are created by this kite. I
have tried to keep this plan as simple as possible, so everyone can build
it. If you are a more experienced kite builder you can build it in your
own way, using more advanced construction skills. This is one of the first kites I designed,
the original version dates back to 1985. The kite is based on the construction of
a Peter Lynn box, which I am sure you have seen once. In fact my
design sort of consists out of 25 Peter Lynn box cells (without the wings) sewn
together in an alternating pattern, to form one big kite. Scott Skinner commented in
the AKA magazine that impressive optical illusions are created by this kite.
Well, let's start building it. Material list 5,5 m2 Ripstop (non fraying)
click on the pictures forfull size image
Use a non fraying kind of ripstop, If you can only get fraying fabric hot-cut it to seal the edges. for this size of kite you can just cut the sail out without needing to hem all the edges. This saves an enormous lot of work. Cut 50 squares (30x30 cm), it helps to use a template out of firm cardboard or thin plywood. Sew loops of edge binding tape or folded ripstop on two diagonally opposing corners of each square. Mark the other diagonal with a pencil. Take a piece of shoelace tape (appr 7 mm wide) or use folded 15 mm edge binding tape. Start at the end of a marked diagonal, sew a loop, containing a key ring, continue sewing the tape onto the whole diagonal and finish at the other end with a loop with key ring. Repeat this once and your two outer panels are ready. Now line up two squares diagonally and put a third one in the middle. Sew loops and tape along the diagonal, stop at the point marked in the drawing with a red spot, pass the tape through a key ring and continue sewing. Later you will use this ring to hold the longeron in place. This way make two sets of 3 squares, two sets of 5 squares, two sets of 7 squares and two sets of 9 squares. In each row of squares, cut a hole in the middle of the middle square for passing the spreader. The sewing is now completed.
|
| click on the picture for
full size image:
Cut 50 pieces of vinyl tube, 3 cm long. Cut a hole through each piece, 1 cm from the end. Pass a braided line through the sewn on loops on the corners of two opposing panels, and through the hole in a piece of vinyl tube, and tie a 1 cm loop ( See the detail picture). Repeat this 50 times. Cut two longerons (8 mm wood) for the outer cells, put a T-joint at the middle of each longeron, attach the arrownocks at the ends and hook the endrings in the nocks. Cut the rest of the longerons (6 mm wood) to the right length, attach the arrownock at the ends, pass the longerons through the key rings and hook the endrings in the nocks. Cut 25 cross spars (5 mm wood, 31 cm long) and insert them into the vinyl tubes. Pass the spreader (8 mm wood) through the holes in the fabric, insert one end into a T-joint, Check how long the spreader should be to tension the kite, cut to the right length, and insert the other end into the T-joint. The two short spreaders at the nose side and the tail side are optional, they protect the longerons during take off and landing. Tie 18 bridle lines to the vinyl tubes indicated with a cross mark. The tow point is indicated in the drawing. To store the kite take out the spreader and fold the kite to a 215x35 cm flat parcel or take out all 25 cross spars to roll it up. I know it sounds all quit complicated, but it
really is an easy kite to build, just take a good look at the drawings
and the photographs.
|

