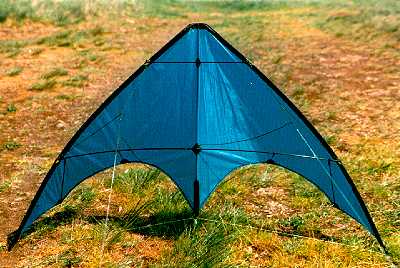
trick tac

The Trick Tac is a small zero wind and indoor kite I developed last year.
The kite does all common tricks very well; excellent slides, flat axels, leading edge starts... no problem.
With very little wind, the kite is fast. If there is much more wind, then put it away!
It's simple to build and not expensive. Try it !
I will give step-by-step instructions but please read them first.
All dimensions are given in metric units.
Materials:
- two solid graphite spars 640mm OD 2mm for the leading edges (cut later after making the sail)
- one solid graphite spar 626mm OD 2mm for the bottom spreader
- one solid graphite spar 220mm OD 2mm for the top spreader
- one solid graphite spar 416mm OD 2mm for the spine
- two solid graphite spars 97.5mm OD 1.0mm for the interior whiskers
- two solid graphite spars 134mm OD 1.0mm for the outboard whiskers
- 16 vinyl end caps ID 2mm (2 for Stoppers)
- 3 vinyl end caps ID 3mm
- 0.5m ripstop polyester Icarex P31 or Ventex for the sail
- 1.5m 20mm ripstop nylon
- Dacron for the nose, reinforcements, and pockets
- 3m bridle line
- Thin line for the sail fixing and the bow line
- heatshrink or insulation tube
The Sail
- Make a template for the sail.
Each square is 1" (25,4mm).
If you need a vector graphic format (DWG, CDR, DXF, HPGL) for plotting send an e-mail !
The red lines are the contour of the kite.
The cyan line is the addition for the trailing edge (use it if you are skilled in sewing).
The green lines mark the positions of the whiskers, the reinforcements, the center tee and the attaching point of the spreaders.
- Cut the sail from only one part of ripstop. Note the proper grain alignment!
- Frame the trailing edge. This work is a little tricky. Cut the seam every few centimeters so it will work better.
Use a zigzag stitch.
If you cut the sail with a hot blade and you have little experience in sewing it's better that you cut it out (remember to use the red line
of the template).
- Attach lines up to the middle of the leading edges where you later sew on the covers.
Careful! Don't cut the lines. You will need them later to fix the spars.
Make covers for the leading edges from the 2cm wide ripstop nylon and sew them to the sail using a zigzag stitch.

- Make the nose from a 2.5cm wide strip of dacron and sew it to the sail with a regular stitch.
Cut the ends with a hot blade.

- Make reinforcement basting from a 1cm x 15cm strip of ripstop nylon and, also, a 1cm x 2cm strip of dacron.
Fold the ripstop in the middle and sew them ltogether. A zigzag stitch works best here.
The dacron goes on the back of the kite and must afford access later for the spine rigging.

- Sew dacron gussets in place for the outward whiskers as shown in the picture.
- Cut out two 20mm - circles of dacron as reinforcements for the interior whiskers.
Fold and sew them in place.
- Fasten two small dacron reinforcement squares at the frontside intersections for spine and spreaders.
- Cut four parts in the sail covers at the positions of the spreades.
Make a 5mm hole at the spine where the bottom spreader intersects.
Framing
- Fix two short pieces of tube on the interior whiskers. Let the spars show by 1.5mm.
Cut two short pieces (2mm) from end caps (you can use these caps later for the tops of the leading edge spars)
and stick them on the tube.
Pierce holes with a needle in the dacron reinforcements for the interior whiskers and stick through the spars.
Fix in place with CA glue.

- Fix small tube pieces on all other ends of the whiskers.
- Make the center tee from a cut 3mm end cap. Use a hole punch to make two holes for the spine and
the bottom spreader at right angles.
- Make 2mm holes in eight end caps (as leading edge connectors and whisker fittings).
- Put the leading edge spars in the sail covers. Don't forget the end caps on the top and the connectors for the spreaders.
Fasten the spars by using end caps and thin lines as shown in the picture (use a needle) and put the 3mm end caps over the 2mm caps.
Fix the leading edge connectors at their positions (using the cut end caps and CA glue).
- Put the spine through the dacron latch and the center tee. Fix it with a line to the sail as shown in the picture
(don't forget an end cap at the top).
- Attatch the spreaders to the kite. Use the remaining four caps as whisker fittings.
Mark the middle of the bottom spreader at the position of the center tee.
- Spread the sail with the whiskers. You can adjust the tension of the sail by moving the outward whisker fittings.
Bridleing
- Fasten a bow line at the 3mm caps of the leading edges and the bottom cap of the spine.
The leading edges must be bent a little (my kite has a wingspan of 825mm).
Both sides must have exactly the same length.
- Make the bridle as shown in the picture.
The measurements are taken from my kite.
Use common kite knots to connect the lines.
For attaching the flying line, use a small loop with a knot (blue line).
This turbo bridle make individual adjustment possible.

Now- wait for a windless day
And enjoy it !
Ronald Krueger (Germany)
If you've problems, questions or you just simply like the kite Email to
RonaldKg@gmx.net


