Basic Sled Kite
Step-by-step instructions for a workshop classic.
-
You will need for each kite:
- 1 off Sheet of A3 copier paper; [See
note on sizes]
- 2 off 12" (30cm) barbecue skewers;
- 3 off 2' (60cm) lengths of Crepe paper 2" (5cm) wide;
- 1 off Line Card;
- 3 feet (1m) sewing thread for the bridle;
- 18 feet (6m) sewing thread for the flying line.
-
You will need for each group:
- Pencils;
- Scissors;
- Colouring materials (crayons or felt-pens are fine);
- Some Sellotape;
- Hole punch.
-
You will need to prepare the following beforehand:
-
- Template(s):
- Make several for a class - say 1 per every 5 students;
-
- Line
Card(s):
- You can wind these beforehand, or use the time when the 'artistic'
activity is going on;
-
- Crepe Paper Strips:
- Roll the crepe up and cut through the roll to make long
strips.
Now let's begin...

- Fold the sheet of A3 paper in half...

- Draw around the template, placing the long edge of the template along the
fold of the paper...

- Carefully cut along the two drawn lines to make the wing shape. Make sure
both top and bottom pieces of paper are cut at the same time...
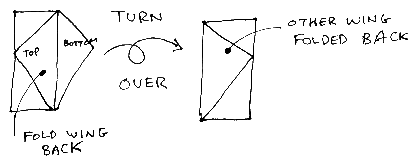
- Fold the top wing back towards the folded edge, so that it just touches
it...
- Turn the paper over and fold the other wing in the same way...


- Open out the kite and place it on the table so that the wings point UP...
- Now colour in the kite! Using bright colours and bold designs is best,
they show up well when the kite is flying...

- Put a piece of sellotape over each wing-tip, then punch a hole in each
piece...

- Attach the sticks along the wing folds using 3 pieces of sellotape about
3cm long for each stick...

- Tape together 3 lengths of coloured crepe paper strip to make a long
tail...
- Sellotape the ends of the tail to the bottom of the sticks to make a
loop...
- Get a length of thread (± 1m) and tie to the holes in the wing-tips...
- Tie an overhand loop exactly in the centre of the thread to make the
bridle...

- Get a line card and tie the free end of the line to the small loop in the
bridle...
Now Go and Fly It!!!

©1995,1997 John Staplehurst
J.A.Staplehurst@ex.ac.uk
last updated: 19/5/97


