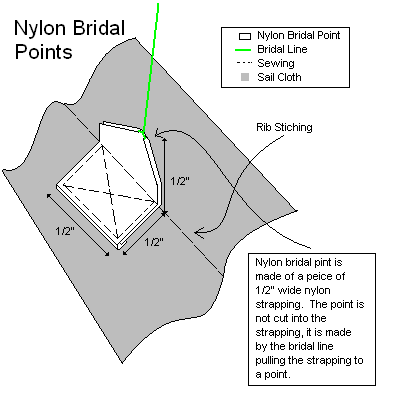
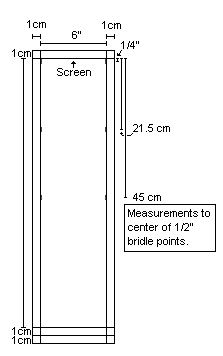
The bridle pints are ½ wide nylon strapping that is folded in half and sew into the kite at the appropriate locations. The measurements on the overview diagram indicate the location of the center of these bridal points. See BRIDLEPOINTS.GIF and BRIDLEPOINTS-BETTER.GIF.
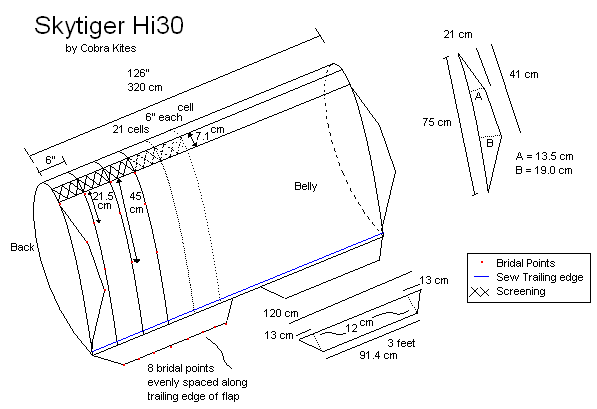
The side flaps are made using the dimensions in OVERVIEW.GIF. The edge that is sewn to the rest of the kite is slightly curved based on the rib shape. 1 cm seam allowance should be added to the side that is sewn to the kite. Seam allowance to double fold exposed edges should be added. The bridal points are sewn to the inside side of the flaps at the appropriate locations. Also look at BOTTOMSKIN.GIF to see how the original is made.
The trailing edge of the kite (not including the bottom flaps) is double folded and sewn 1cm from the trailing edge. The bottom flaps are also folded into this and sewn at the same time. This means that the last 1cm of the profile is sewn flap, unlike a flexifoil where the trailing edge is extra material behind the rib profile.
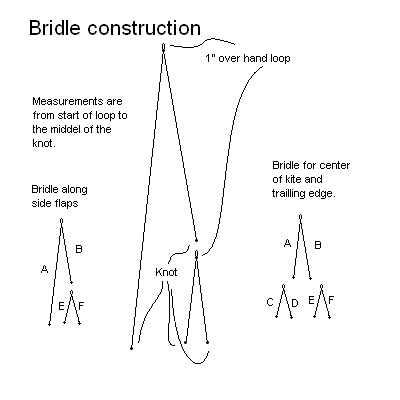
See BRIDLECONTRUCTION.GIF to see how the bridle is constructed.
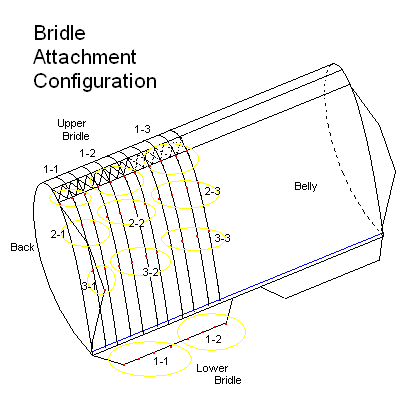
See BRIDLEATTACHMENT.GIF to see where each bridle set attaches.
All measurements are in cm and are after full stretch has occurred. Make sure the spectra is pre-streched.
See Hi30.XLS for the rest of the bridle. I haven’t measured my own bridle.
Upper Bridle Set 1 - 1
A = 181.1
B = 130
E = 44.6
F = 44.8
Upper Bridle Set 1 - 2
A = 164.9
B = 131.8
E = 54.7
F = 54.7
Upper Bridle Set 1 - 3
A =
B =
E =
F =
Upper Bridle Set 2 - 1
A =
B =
C =
D =
E =
F =
Upper Bridle Set 2 - 2
A =
B =
C =
D =
E =
F =
Upper Bridle Set 2 - 3
A =
B =
C =
D =
E =
F =
Upper Bridle Set 3 - 1
A =
B =
C =
D =
E =
F =
Upper Bridle Set 3 - 2
A =
B =
C =
D =
E =
F =
Upper Bridle Set 3 - 3
A =
B =
C =
D =
E =
F =
Lower Bridle Set 1 - 1
A =
B =
C =
D =
E =
F =
Lower Bridle Set 1 - 2
A =
B =
C =
D =
E =
F =
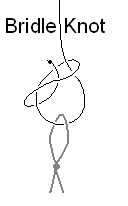
See BRIDLEKNOT.GIF to see how to make a bridle knot. This knot is used to attach two parts of the bridle together as well as connect the bridle to the bridle points.
Each grouping of bridle lines (UPPER RIGHT, UPPER LEFT, LOWER RIGHT, LOWER LEFT) have all their loops put together and a dacron over hand knot loop larks heads each grouping together.
Belly is the bottom skin and back is the top skin. See HI30.MC
and HIGHTIGER-HI30FOIL.MC for profile use MegaCad
to read it
CM
Belly
Back
0
0
0
5
1.35
1.05
10
2.4
2.2
15
3.3
3.3
20
4.1
4.0
25
4.9
4.7
30
5.6
5.5
35
6.2
6.1
40
6.7
6.65
45
7.1
7.2
50
7.4
7.5
55
7.8
7.9
60
8.0
8.1
65
8.2
8.4
70
8.6
8.35
75
8.8
8.2
80
8.8
7.8
85
7.5
6.7
87.5
6.1
5.6
90
3.2
3.5
90.5
3.0
3.0
91.0
2.0
2.3
91.6
0
0
MAX BELLY
77
9.0
MAX BACK
67
8.5
SCREEN LOCATION (ON BELLY)
82.8
8.2
88.7
5.1
Construction
Steps:
1. Cut out and mark all 21 bottom skin pieces
2. Cut out and mark both outside ribs
3. Cut out and mark all 19 inside ribs (with cross vents)
4. Cut out and mark top skin
5. Cut out and mark both bottom flaps
6. Cut out and mark both side flaps
7. Cut out screen mesh
8. Cut out all needed bridle points from Nylon strapping (approx 75)
9. Sew right most bottom skin piece to next bottom skin piece with all 3 bridle points in place.
10. Continue sewing all the bottom skins and bridle points to create the bottom skin. Keep measuring to make sure the skin is square and each skin is no more or less than 6”
11. Sew the screen mesh to bottom skin
12. Sew top skin to screen mesh
13. Sew the double hem on the right ad left side flaps (not the hem goes on different sides for the right and left flaps. The hem will point towards the inside of the kite)
14. Sew the both bridle points to both side flap (bridle points towards the inside on the same side as the hem)
15. Sew the left most rib, the one bridle point and left side flap to the left side of the bottom skin
16. Continue sewing all the inside ribs in order to the bottom skin
17. Sew the right most rib, the one bridle point and the right side flap to the right side of the bottom skin
18. Sew the left most rib to the top skin.
19. Continue sewing all the inside ribs in order to the top skin
20. Sew the left most rib to the top skin by inverting the foil into the last cell.
21. Pull the foil outside right and insure that everything is ok.
22. At this point you will need to cut off any exceed material along the trailing edge. It is wise to leave some material uncase you constantly sew each cell a little smaller. It is very important however that the amount of material removed be even across the entire trailing edge to insure the trailing edge is square tot he rest of the like.
23. Sew the hem onto both bottom flaps. (both sides will be have the hem towards the inside of the kite)
24. Sew the bridle points to the bottom flaps
25. Lay the bottom flaps in such a way that when the trailing edge is double folded the bottom flaps will stick out the proper amount. It would be wise to tape the flap into position.
26. Double fold the trailing edge up into the bottom flaps and sew in place. 1cm from trailing edge
27. Sew again, 2mm from the trailing edge.
The kite is now ready to bridle