KITE AERIAL PHOTOGRAPHY - KITES
John Maxworthy, Long Island, NY.
Updated: Dec. 28, '96
Here is the long and the short of it. The short of it is the first 2 sections
of the above index. These materials can be ordered by mail, (or purchased at
your local kite store, if you are fortunate enough to have one) and purchased at
a hardware store. The long of it is the last section giving detailed
instructions on building the kite. Your choice......
KITE SELECTION
There are a number of common
sense guidelines in selecting a kite for use with KAP. You would like the kite
to be stable and not move around. The phrase used is " nailed in the sky ". The
kite should have a good wind range and be able to be lofted in the mornings when
there is typically low wind speeds and later in the day when wind speed
increases. You would like the kite to have a high flight angle, meaning a lot
less line is put out at a 60 degree angle to the ground compared to a low angle
of 25 degrees. You would like a kite that is easy to setup and launch (and to
take down again.)
All these considerations finally boils down to having a kite you are
comfortable in using and you have confidence in handling. For myself, that is
the Rokkaku. Yes, I consider it to have many of the above desired
characteristics: compact for transport, quickly assembled , disassembled for
repacking, easy on-site adjustments by the amount of bow on the cross spars or
tow line position on the bridle for different winds, and could even change the
cross spars for higher winds (although I've never done it). But in the end, I am
comfortable with the Rok.
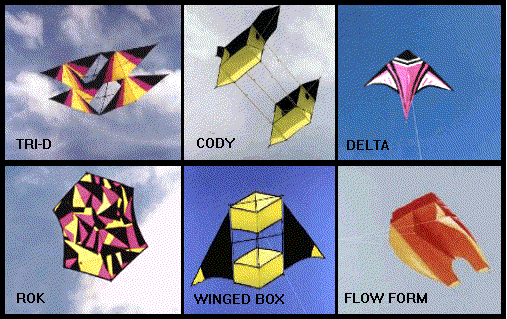
To be fair, the images above identify a number of kites used for KAP
platforms that would probably perform just as well. Each has some pluses and
minuses when compared to the guidelines. A few comments on each:
- Cody
- good for high winds, alot of assembly/ disassembly time involved, can be
expensive.
- Parafoil / Flowform
- always exciting to see one of these collapse when the wind direction
changes or dies down, but certainly easy to assembly because of no internal
spars and compact to transport.
- Delta
- easy to assemble & launch, can adjust for higher winds with a tail or
drogue, would think a fairly large size would be needed for a KAP rig. also
has a chance of gliding down if the wind stops, instead of falling like a
rock.
- Tri D
- seems to fit the guidelines, is predictable, will have to try it sometime.
- Winged Box
- a certain amount of assembly required, but has the wing area for lighter
winds and the structure of the box for stability in heavier winds.
- Delta Conye
- cannot offer an opinion, never flown one.
If you have one of these kites already, try lifting a load the weight of a
KAP rig (2-4 lbs) and see how it behaves. If you don't have a kite to start, I
have three suggestions.
- Visit your local kite store. I have never been in one where the people
haven't been knowledgable and willing to help.
- Send for kite catalogs and mail order what you need. Check out theKITE FLYERS SITE HOMEPAGE It has kite
business homepages. Into The Wind is one mail order house of which I'm
familiar and the people are friendly plus very service oriented.
- Build your own kite; the last section of these pages gives these
instructions and sources for materials.
LINES/ WINDERS/ KNOTS/ ETC.
Lines/ Winders
Don't have to beat this section to death. I use 190
lb. test, braided dacron line with a 400 lb. test fishing swivel on the end of
the line and on a winder made by myself. The winder was jig sawed, sanded and
clear lacquered from plywood. Why make the winder? No good reason, other than I
already had the plywood as scrap pieces.
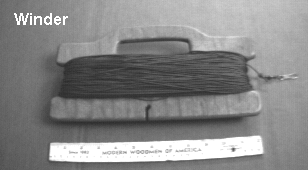
Why use 190 lb. test line when lifting 3-4 lbs of camera equipment? The
actual pull might be 10 - 30 lbs, but a gust of wind could factor this up by
what? 5X? 10X? Again, it is what I feel comfortable using.
Knots
I don't want to make this complicated but knowing a few knots
can make this experience alot easier and give you a warm feeling having the
confidence that a specific knot should hold. The bowline, slip, fishermans, and
halfhitch are commonly used. There is a WWW page on knots also
that can be checked, if these diagrams aren't clear.
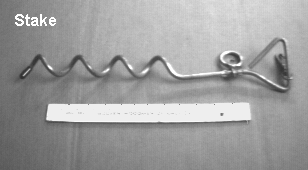
 Ground Stake(s)
A ground stake(s) is needed if there is
nothing to tie down your line where you are flying. Remember, you will be
lofting the kite, mounting the camera rig to the line, paying out more line and
then possibly use a remote control transmitter to adjust the camera and trip the
camera shutter. Having the kite line staked is needed if only to hold the line
steady. For a stake, I use the 3/8" dia. metal wire, spiral shafted type sold in
the hardware store for $3-4. The intent of it is apparently for leashing a dog.
The recommendation seen in catalogs is not to use it in sand; I don't understand
why; have always used it at the beach. Regardless, be careful, a stake becoming
uprooted and flying loose would be very dangerous.
 Gloves
A pair of leather gloves from the hardware store
are more than handy when trying to wrestle down 500 ft. of line with a kite on
the other end that was initially adjusted to stay put in the sky.
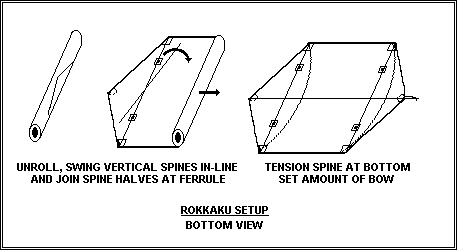
BUILDING A ROKKAKU
The following directions are for a specific size ROK. ie. 55" x 66". They can
be adjusted as you see fit. The materials can be sourced as described below. The
construction is intended to be followed by using the images with few supporting
comments. Where an image shows general information, click on the image for
another image of the details.
These " required " materials are those needed for a minimum amount of
construction time. The sections below also suggest alternative methods
(requiring additional work), but would give the kite more of a " store bought
look " .
- 2 yds. - ripstock nylon, 3/4 oz., purcahse @ 56" wide
- 2 pcs. - fiberglass tubing, .370" dia. x 54 1/2" lg. (Spine)
- 5 pcs. - fiberglass tubing, .248" dia. x 32 1/2" lg. (Spreaders)
- 1 pcs. - fiberglass rod, 3/16" dia. x 58" lg. (to make internal ferrules
for .248" fg tubing)
- 2 pcs. - tensioner, can buy, make, or use a button
- 2 pcs. - line, 11 yds @ 80 lb. or better
- 2 pcs. - misc. from hardware/ bait store: rubber end caps, split rings,
swivel snaps.
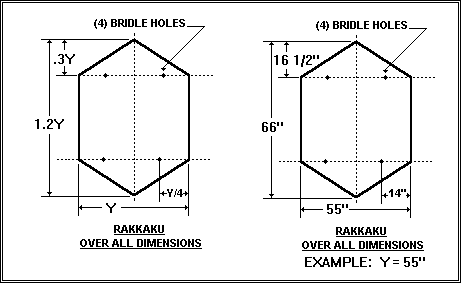
- This size was selectedbased on using 56" wide ripstock; therefore no seam
was required.
The Kite Studio, phone 610 395 3560, carries this
width material.
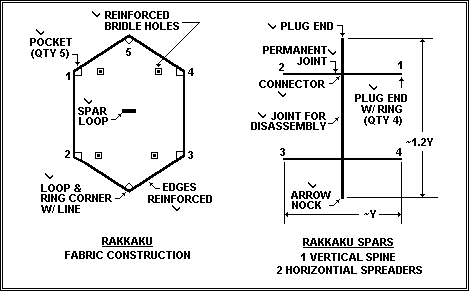
- Click on images for details of items check marked.
- Use a straight sewing stitch (maximum 8/ inch) to initially hold in
position the pockets, edges, reinforcments, loops in place. Finish with a
zig-zag stitch (The type zig-zag which has 6 stitches, if available on your
machine) on the edges.
- Alternate construction would be for all six corners to have loop &
rings and spars to have arrow nocks.
- Alternate materials for the reinforced edges could be 200 or 400 denier
dacron and for the reinforced backer pieces would be ripstock tape, or
fiberglass reinforced polyester tape.
- Alternate materials for the pockets could be leather.
- Alternate method for bridle holes would be to hot cut with a soldering
iron or heat the end of a 1" tube with a propane torch and then hot cut a hole
with the end of the tube.
- It is helpful to use spray adhesive, 3m Photo Mount or 3m Spray Mount, to
hold pieces in position while sewing. (Actually I like the 3m Spray Mount
better because it doesn't gum up the sewing machine needle, if you let it dry
for acouple of hours first.)
- Epoxy all spar components. (Don't use 5 minute epoxy; it is not
waterproof.)
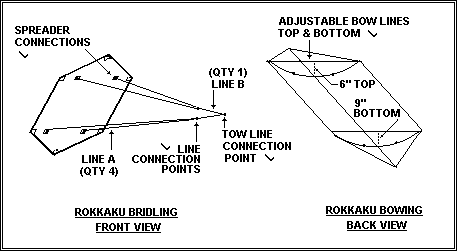
- Click on image for details of items check marked.
- The shown PVC tubing at the spreader/ bridle line connection holds the
spreader from moving up or down. An alternate method would be to sew spar
loops at each bridle hole.
- As shown, the .370" fg tubing spine needs a permanent connector. I epoxy a
piece of .032" wall brass tubing to a piece of the .248" fg tubing for the
internal ferrule, if the appropriate size fiber glass tubing or rod isn't
handy.
- Lines A = 70" each and line B = 40".
- I place epoxy on all bridle line knots to make the connection permanent.
- Adjust the bridle tow point with a trial launch or two. Remember, the
higher the bridle point toward the top of the kite, the lower the flight angle
and less weight can be lifted.
- If needed, increase the amount of bow to stablize the kite. Start with the
bottom bow.
You can reach me by e-mail at: jmaxworthy@sprynet.com
http://home.sprynet.com/sprynet/jmaxworthy/kapkites.htm