Roll-up kite bag
Kyle Skopelitis, a very enthusiastic Doldrummer,
designed and created the roll-up kite bag and kindly provided the plans
for the bag for use by other Doldrummers and visitors to our website.
The bag involves a LOT more work than a "normal" kite bag, but is well
worth the effort.
Description - A practical storage unit for kites which is easily
transportable and is easily adjusted/modified to accommodate up to 25
kites and other paraphernalia including lines, spares, feathers, spars,
insulation tape etc.
The advantage of this design over a normal bag is that everything
has its place and there’s no "hunting" around for stuff at the bottom
of a bag. The following plans are only indicative and can easily be
adjusted to suit individual needs.
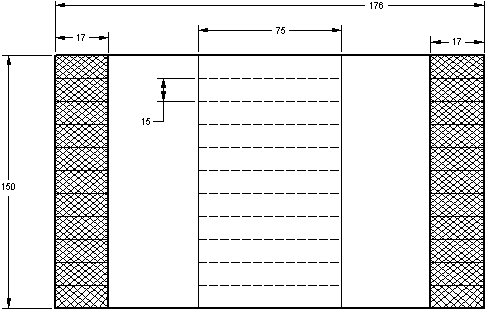
The inside of the bag
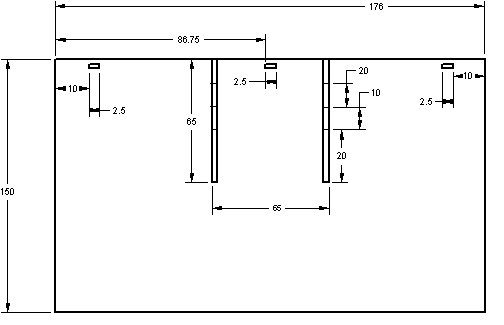
The outside of the bag
Notes
a) The drawings are not to scale.
b) All measurements in cm.
Materials needed:
- 180cm x 150cm strong nylon (the type sports bags are made of). The length should be slightly longer than your longest kite.
- 2 x 17cm x 150cmstrong mesh (use a mesh with wide openings, the idea is to let sand through, but not your lines, etc)
- 150cm x 180cm ripstop or similar
- 2 x 2.5cm x 150cm webbing (to be used as seam for mesh)
- 3 x 2.5cm x 45cm webbing (for securing straps)
- 2 x 5cm x 65cm webbing (sewn onto bag to hold handles)
- 3 x 3cm x 2.5cm webbing(to hold securing straps)
- 2 x 5cm x 100cm webbing (for handles)
- leather - optional (to cover handles)
- 6 x 5cm D-rings (metal or plastic)
- 3 x 2.5cm male/female plastic clasps
- 4 spring-loaded clasps to attach handles to kite bag
Construction
Main body
Hot cut the sport bag nylon square (we will return to the main body later!)
Sew the 3 pieces of webbing that will hold the securing straps in place
onto the main body on the long ends of each piece of webbing, leaving
at least 2.5cm for the securing straps.
Mesh for winders, line, spares and accessories
Cut the mesh in 2 lengths of approximately
150cm and about 17cm wide. Kyle used shade netting, but felt it was a
bit too coarse and difficult to work with. Any relatively strong nylon
mesh with wide (say 2mm+) openings should work.
Seam one side of each strip with the 25mm webbing by folding the
webbing double over the mesh and stitching (zigzag or straight) onto
the mesh. Ideally the mesh needs to be sized according to the width of
the kites so that the bag rolls evenly.
Cut out the main body.
Stitch the mesh to the nylon body (to the ends of the long sides as
shown in the drawing). First stitch the sides and then stitch pockets
(sew straight lines across the width of the mesh as indicated in the
drawing) of approximately 15cm (slightly less if you calculate it
correctly). Do NOT seam the sides before doing the spar pocket (see the
last "Main body" section). The bottom of the pockets will be formed by
the nylon as discussed in the "Main body" section.
Don't stitch right to the side of the bag so that when the bag is rolled up, you’d get a smoother finish.
Main body (again)
Make a hole ± 4cm from the edge (top) of the
bag, 1cm from the side (on either side) to allow for insertion of the
spars. This should preferably done with a soldering iron.
Fold the ends over (2cm) onto which the mesh is stitched and create
a seam for the mesh and the top/bottom of the bag. Remember to use a
rolled seam so that the nylon will not start to unravel later.
Handle attachment webbing
Mark the position for the D-rings on the
main body (refer to the drawing of the outside of the bag), i.e. 15cm,
35cm and 45cm from the side of the main body.
Stitch the webbing to the main body as shown in the drawing. Stitch
the D-rings at the 15cm mark to the closest side of the bag and the
other D-rings to the other side. This will make it easier to attach the
clasps of the handles.
Kites holder
- Fold the ripstop double, so that you have 2
x 75cm wide and 180cm long. Seam the length and turn the stitched
"tube" inside out, with the seam now inside.
- Stitch the sides to the nylon body with a straight stitch (see drawing to determine placing of "Kites holder").
- Kyle suggested: "The width of each of the compartments is
determined by the width of each kite in its bag. The measurements
indicated are those that were suitable for my requirements. Each
compartment is measured as follows:
- Lay the "Main body" flat
- Position the kite lengthways
- Position the "Kites holder" fabric over the kite so that the arch/loop is on the top
- Pin/hot weld and mark line of stitch with tailors chalk or equivalent
- Stitch with straight stitch
- I measured and stitched each one individually.
- I also made one of these to accommodate spars in a nylon bag. Also,
the feather I made fits into this bag and provides additional support
in the body of the bag.
- For soft foils and any other kite variations, I’d make kite bags to
replace those supplied so that they’d fit into this configuration."
Main body (again)
A spar pocket is stitched along the entire
length of the bag (fibreglass spar or a spare carbon graphite spar) to
give some rigidity and also provide a point from which to start the
roll. This pocket should be sewn on AFTER the mesh has been sewn onto
the body. The pocket should be approximately 1cm wide (i.e. 2cm folded
over).
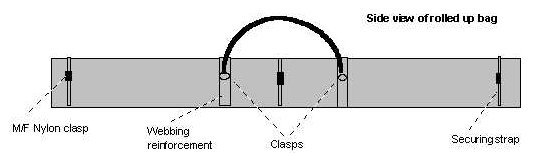
Handles
Slide a spring-loaded clasp over a 100cm
piece of webbing, fold the end of the webbing over and stitch with a
straight stitch. Repeat on the other side and for the other 100cm
webbing.
The handles are hooked onto the D-rings ("Handle attachment webbing").
If you want to, cut a 7.5cm x 50cm strip of leather. Insert some
snap rivets at the ends and fold over the handles to make carrying more
comfortable.
Securing straps
Slide the securing straps through the 3 holes as indicated.
Slide a male clasp over one side of each securing strap, fold the
end of the webbing over and stitch with a straight stitch. Repeat on
the other side with the female parts of the clasps.
AFTER ALL OF THAT THE KITE BAG SHOULD BE READY!