 You will need:
 - Long straight sharp scissors are the best
Making your kite

1.Make 3/16 inch holes at the ends of the two 24 inch sticks
2. Make a groove on the top (only) of the headstick and at the ends of all the other sticks
3.Nail sticks at center of 20 inch cross stick, 2 inches down from the center of the 24 inch sticks and through the tapered end of the head stick
4.Stretch the bamboo bow between the two small holes in the longer sticks
5. Secure it with string to the head stick
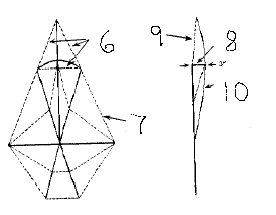
6. and 7. String the kite as shown in the diagram.
(6. This string is used for 'hummers' or 'buzzers only. Paper does not go here)
7. Paper your kite with the tissue paper. First cut out all your shapes. Paste light colours before dark ones. Paper lying over the inner strings lies flat. Paper over the outer strings is turned over and glued on itself.
8. This shows a side view of the bamboo bow - there should be a 3 inch space between the head stick and the 'hummer' string underneath.
9. Hummers can be put on this string - these are cut like wings, folded over the strings and pasted to themselves
10. Notice the way the headstick is bowed.
11. Decorations can be added to make the kite look pretty. Hearts and stars are common. Some kites have strips of coloured paper wrapped around the head stick, others have "tassels" made of strips of paper cut into narrow ribbons and streamed off the headstick and cross stick.
Flying your kite
You will need strong string, and strips of torn-up cloth for the tail
 12. Tie small loop here to prevent slipping
13. Tie the end of the flying string to this stick in back.
14. Pass string through paper, close to these two sticks
15. This is the tail loop - tie tail to this
A. Mounting Loop B. Pulling Loop C. Cross stick D. Tail loop

Making your Kite
March 1996, St. George's Preparatory School, Bermuda
Page created by Primary 7 students with kite coloured by Amber Simpson, Primary 5
Bibliography:
Bermuda Kites, How to Make - and Fly Them
Frank Watlington
Island Press Ltd.
Please let us know how your kite turned out: gprep@bbsr.edu