|
|
|
|
|
Gentle Giant Buka
|
This big kite spins and dives in a slow, graceful way that makes the air around it feel like molasses. Overpowered in winds over 6 mph but in the barest breeze it is a real performer. I have flown it on waxed crochet thread, and the simple unadorned red panel really decorates the clouds. This fighter resembles a huge buka designed by Dennis Ische. My version is somewhat smaller since it was made from the materials at hand. To make one, the following materials will be needed. Inches are shown in decimals to help those converting to metric. This would be a good beginner's fighter kite because of its slow flight and ease of adjustment. |
|
Materials: |
|
Cut the fabric with a razor knife, hot-cutter or soldering iron. Hot cutting works best and working on a backing of poster board, masonite or glass makes the task easier. A metal straightedge to guide the cut is a must to assure precise edges. Fold the sail in half to find the center for the notch.
|
|
|
Fold the remaining three Dacron pieces in half. These will form the lower spine pockets. The pockets wrap around the bottom edge of the sail, and should be lightly taped or glued in place for sewing, remembering that after sewing a rod should slide into them on the back of the kite. The center pocket should be in the center of the sail, pointing straight up at the center notch on the leading edge. The corner pockets should point to the opposite corner so the rods will go straight into them. Stitch along each side of the pockets, leaving enough room for the rod to fit. The sewing is now done. |
|

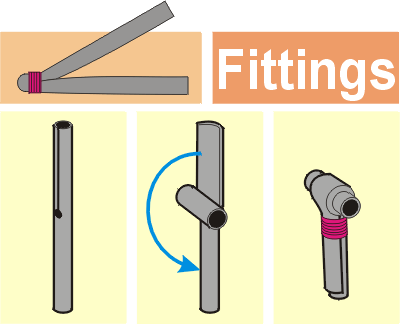
Cut two pieces of tubing 3 inches long. Fold them each in half and tightly wrap the folded end with 12 turns of Dacron thread to bind them, then seal the thread with a drop of superglue. You now have two "V" fittings to form the upper corners of the kite's frame. The central "T" fitting can be bought at a kite shop but since you have nothing else to do, cut a 3 inch piece of tubing and fold it in half. Cut off a small corner of the folded end forming a small hole. Straighten the tube, and slit the tube from the hole to one end, cutting only through one side of the tube. Cut a 3/8 inch section of tubing and press it across the center of the first piece. The slit end is now flattened and wrapped over the small tube and pressed against the other side of itself. Wrap snugly with thread to hold the fitting together and seal with a few drops of superglue. You should now have three fittings and some crusty fingers. |
|
Insert the top rod through the leading edge sleeve, adding the center "T" in the middle notch, and center the rod in the sleeve. Slip the "V" fittings onto the rod ends, sliding them under the fabric. The rod will have to be trimmed so the "V" fittings are positioned as shown. Now superglue the "V" fittings to the ends of the rod making sure they both lay flat against the kite. Next, trim the rod to fit snugly between the "T" fitting and lower center pocket and do the same for the two diagonal rods. At the intersection of the three rods, tie them together with a few wraps of thread. To aid folding the kite, a twist-tie from a bread bag can be used here. Now, three holes need to be pierced through the sail. I use a large needle with a wine cork handle, heated with a cigarette lighter. Two holes are made just below the top rod, 2 inches to either side of the center spine. A third is made 8 inches above the bottom of the kite directly in front of the center spine. |
|
|
|
Knot Work Start by tying a foot of thin line to one of the Dacron loops at the top corner. Run this line around the "V" fitting and back to the loop. Tie it snugly and repeat on the other side, paying attention to putting even tension on the sail. This should be enough to eliminate wrinkles from the leading edge. Now a bow-line is tied from one end to the other as shown. The tautline hitch will grip the line and slide to adjust the amount of bow in the leading edge and flatten the kite for transport. Use whatever knots you prefer, but the prussik loop and tautline hitch are really useful. They allow the kite to be quickly adjusted without having to re-tie knots or grumble. Please refer to the pictures and let me know if it's too confusing. A drop of water-based glue to hold non-adjustable knots in place can help, but superglue can be abrasive to cotton line. |

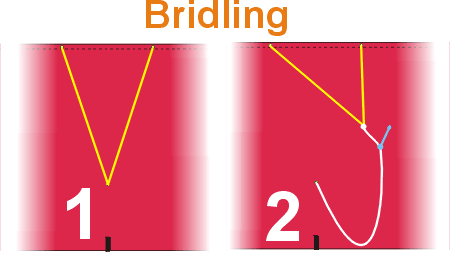
To make the bridle, pass one end of a piece of line through one of the holes in the leading edge and tie it around the top rod. Repeat with the other hole and the other end of the line. (Yellow line) Here I prefer a slipknot. Leave enough slack in this line so that the center will pull down to the third hole below the center of the sail as shown in Figure 1. A 3 foot piece of line with a 1.5 inch loop tied in one end will form the lower bridle line. (White line) Tie the prussik loop to the center of the upper bridle as shown and put the other end through the third hole and tie it to the spine, producing a 21 inch lower bridle length. Trim off the excess line ends. Tie a 3 inch loop to form the tow point and attach to the upper part of the lower bridle forming a second prussik loop 5 inches below the intersection of the top and bottom bridle lines. (Blue line) The prussik loops can be unlocked for adjusting as in Figure 3 or locked to prevent sliding as in Figure 4. You now should have a finished buka!
|
|
|
Now go fly it in light wind and have some fun! This is a light-wind kite and can fly in air that leaves most kites on the ground. Remember to stop flying if the wind picks up too much. This big kite can grab enough wind to snap the line or bridle. This kite can be scaled up or down, producing kites with different personalities. Check out Dennis Ische's site for more fighters. By the way, the appellation "Gentle Giant" was suggested by Dennis. Let me know if these instructions need clarification. Fair winds, |
|
|
Comments Hello, Enjoyed flying it, my first Buka ever.. Take a close look on the cross spars: isn't the length wrong? Plan says 32", I would say 34". Got more comments on that one?? Heidi (alias John McKenzie) My kite has 32.5" rods. Depends on how closely-fitted the pockets and V-fittings are, as well as the tightness of the sail on the spars. The kite was designed around 32.5 inch rods, but perhaps the sail should be a bit smaller if longer rods are unavailable. The sail tends to stretch between opposite corners, a tendency my fabric bukas share. This makes for a vague response when turning. The diagonals are now longer, with 3/8 inch extensions added to the lower ends, spliced on with bits of electrical insulation. I was trying to spec standard lengths but it's always something... |
|