Wanna Know some Fighter kite Secrets?
Paul Peters
 We have major information here! This goes way byond the already astounding information
that you can find at http://www.fighterkites.org . What we have here are a number
of breakthroughs in fighter kiting. Bruce Lambert has step by step information
on how to build a fighter kite in A New Way to Build the Perfect Fighter Kite.
This is a new and innovative look at the construction of a fighter with many illustrations.
Do you know how to set the bow without using a "bow setter"? Building
an Orcon Fighter Kite…Bruce’s way
We have major information here! This goes way byond the already astounding information
that you can find at http://www.fighterkites.org . What we have here are a number
of breakthroughs in fighter kiting. Bruce Lambert has step by step information
on how to build a fighter kite in A New Way to Build the Perfect Fighter Kite.
This is a new and innovative look at the construction of a fighter with many illustrations.
Do you know how to set the bow without using a "bow setter"? Building
an Orcon Fighter Kite…Bruce’s way
Got a kite that always veers to the ground going left to right? Have another that
is totally out of your control? It could be the kite. It is the kite! If it's
not properly tuned, it can't go where you want it to go even if it wants to. Bruce
has another article here on how to make these kites perform in a predictable manner
Bruce’s Fighter Kite
Tuning Tips.
Well, you have the kite building skills, the will and the inspiration to do line
touch, where do you go from here? Go? Are you ready for a week of fighter kites
and fighter kiting. Not just a weekend, but, an entire week! It's Total Body Immersion.
Where, you ask? At the Washington State International Kite Festival (WSIKF). This
is already at one of the largest Kite festivals in the world. The best part is
that there are three fields devoted entirely to fighter kites for the whole week.
You will want to build slowly by coming by and seeing and meeting the top fliers
from all over the continent ready to talk and share what they know about fighters.
Fly with them, side by side, trading points and pointers on everything from building
to flying tips and strategies. These are the guys that really build. They fly
like you can't believe. They know manjha and how to fly with it. What are your
questions? Here you can find the answers. There will be informal competitions
and demonstrations using several styles of kites. Can you fly a Buka? Novice competitions
are line touch. A skills competition for the over 50 set will start to heat up
the competitive juices. Paste a kite, knock over a cup. The culmination of the
week is the NFKA/WSIKF SHORT LINE FIGHTER KITE WORLD CUP 2002. This is a two day
free for all modified round robin where all of the entrants get to fly matches
against at least twelve other fliers to determine the finalists. Top fliers fly
a robin to crown the Top Shortline Fighter Pilot in the world. Come see the best
shortline fighter pilots in the world. For more information see
http://www.funbeach.com.
Building
an Orcon Fighter Kite…Bruce’s way
The following method of building a fighter kite works really well, doesn’t require
special skills and is reasonably quick, about 2 hours or less to build a kite.
Obviously there are many building methods that result in successful fighter kites,
but this works well for me and for those who have attended my fighter kite workshops,
so I thought I would share it.
As you try this method of building a fighter, you will probably modify it to
better suit your kite building preferences. Please share with me the changes
that seem to work better for you! I am always eager to hear about ways to make
building a fighter kite easier and quicker.
Any fighter kite you plan to build, you can adopt the following techniques.
For a fighter kite skin, I prefer black Orcon, but if you are using Tyvek, Icarex,
ripstop nylon, Mylar or other plastic film, the information here can easily
be adapted.
The kite parts you’ll need to make
a kite:
A pre-cut fighter kite skin of your favorite design, 1 bamboo spine, 1 carbon
fiber bow, 2 vinyl end caps or straw pieces, 2 bridle stops, (heat shrink tubing),
a couple of toothpicks, 2 battens, if your kite design uses battens, 2 pieces
of Orcon tape for reinforcing the leading edges, a few other small pieces of
Orcon tape for reinforcements, cornstarch & about 48” of bridle line. The
kite parts will be bonded together using contact cement & a couple drops
of CA glue.
Two aspects of this method eliminate the need for a bowsetter.
A. You will
need 2 vinyl end caps of 0.062” diameter or make a couple of end caps from small
diameter drinking straws, the kind typically used for stirrers. The photos
show the straw version. I use a mini hot glue gun to inject hot glue into one
end of a straw so it travels inside the straw about ½” or so. Then I cut off
about 1” from the glued end. And repeat the process so I have 2 pieces of straw,
each with glue in one end. Then I insert a toothpick into the open ends and
hold them up to a light so I can see where the glue stops inside the straw.
I then trim the glued end so only 1/16” to 1/8” of the straw pieces contain
glue and that the inside point of the glue is aligned, one straw to the other.
Then I trim the open ends so both pieces are the same length, about ½” to ¾”
total length.


- Whatever kite template or plan you are using; add to the bow hems, at the
wingtips, an extra long tab. These tabs should be about ½” wide by ¾” long.
They are used to hold the straw pieces or end caps as you will see in the
photos.

Construction Steps:
- Smooth out the kite skin and secure it to your work surface, I like to work
on a glass surface. Formica or a similar surface also works. A good way to
secure it is by spraying a light mist of water on the work surface, lay the
kite skin onto the water and smooth over it with your hands to remove wrinkles.
This will secure it to the work surface quite well. Another method is to
tape the skin to the work surface with masking tape.

- Using a pen that will easily write on black, draw a line on each side of
the kite about ¾” long starting from the point on the trailing edge where
the bow tip is to be located and continue pretty much along the path of the
bow toward the nose of the kite, see the photo. Also draw the lines of the
spine, battens (if your kite uses battens) and a line parallel to the nose
area of the leading edge that will be the guide for the reinforcement tape.
I usually make the reinforcement ¼” to ½” wide, make sure the width is equal
on both sides.


- Prepare the spine. This may require some shaping of the bamboo using a
knife, or may only require cutting to length and straightening, or maybe only
cutting to length.
- OPTIONAL STEP: Many fighter kite makers don’t feel there is any benefit
in reinforcing the leading edge of the kite near the nose, but I always do
it. I find it adds durability to the kite if nothing in improving its performance.
If you are going to reinforce the leading edge near the nose, now is the time.
Use a piece of Orcon tape about 3/4”-1” wide and the length of the nose leading
edge. Align one long edge of the tape to the line drawn on the kite, and
allow the balance of the tape to extend onto the work surface. Smooth out
the tape. Cut away the excess tape using a straight edge and razor blade.
Cut along the leading edge of the skin.


- If your kite plan uses battens,
smooth the ends of each batten.
Start
the Gluing Process
NOTE: When gluing, here’s a method
that works pretty well and is easy. Pour a small amount of contact cement
into a lid of a small bottle, mini cupcake paper, or anything that is disposable.
The glue spreader I make from a piece of closed cell foam pipe insulation
that I buy at the hardware store. I cut a slice about ¼” – 3/8” wide from
the foam pipe insulation and cut that slice into 3 pieces. Each piece I
use as a glue spreader. These are easily shaped with scissors to any width
and are disposable.


- If your kite uses battens, apply
glue along the drawn lines of the batten locations and place battens on
the glue line and press them firmly into the glue while the glue is still
wet.

- Apply glue to the wing tip tabs, the area of the kite skin below the
tabs that the tab will come in contact with when folded over to hold the
end caps. Also apply glue to the end caps. To do this I put the end caps
on toothpicks to hold them and apply glue, then lay them on a piece of
waxed paper to dry. Allow the glue to dry for a few minutes.

- Apply glue along the spine line.
- Apply glue to the entire length of the spine on the “skin” side of the
bamboo. Set aside to dry.
- Using a toothpick as an aid, precisely locate the end caps on the line
you drew at the wing tip & press them into the glue. Then, while
pressing the toothpick against the kite skin to hold the end cap steady,
fold the wing tip tab over the end cap so it wraps snuggly around the
end caps; press the tab firmly onto the kite skin below the end cap where
the glue has been applied. Remove the toothpick and repeat the process
on the other wingtip. Depending on how you made your tab, you may need
to make a cut to separate the tab from the rest of the bow hem. I use
a razor blade to do it. Begin the cut at the outside edge of the end
cap.
 
- Prepare the bow. This requires smoothing off the ends with sandpaper
and sliding on 2 heat shrink pieces (each about 1/8” long) that are used
for bridle stops. Slide the stops near the center of the bow.
- Hold one end of the bow in each hand. Compress the bow a little, making
it bend. Using one hand, rotate the bow and
feel that it “jumps” as you rotate it. The carbon fiber bows are not
uniform around their axis. Find a place where it “jumped” to, that is
its natural place to bend, now insert each end of the bow spar into one
of the end caps. Check to be sure the bow is located near or at the point
it is supposed to at the spine and the points where the leading edge shape
changes. If it doesn’t, adjust the length so it does. Because of using
end caps, the part of the end cap filled with glue will reduce the actual
length of the bow required for your kite, but only a tiny amount. In
some kites it won’t make any difference.

- Apply glue to the bow and the bow hem area on both sides of the kite.
Let it dry for a few minutes.
Glue
the Bow & Spine and Finish the Kite Body
- After the glue has dried for a few minutes, fold over the hem to enclose
the bow on both sides of the kite. During this process, be careful
not to distort the shape of the bow while you are folding over the hem.


- Carefully lift the bow enough to allow the
spine to fit underneath it. Slide the spine under the bow and touch
only the nose end of the spine onto the very tip of the nose of the
kite skin. Then slowly lay the spine along the glued spine line on
the kite skin. Be very careful not to allow the glued side of the spine
to touch the glue on the spine line of the kite skin until you have
the spine properly positioned above the line. One way to help a nasty
“mistake” is to put a strip of waxed paper on the glued spine line,
lay the spine on the wax paper, position it, and pull out the waxed
paper while holding the spine in place.


- Cut 4 pieces of Orcon tape about ½” square. Apply one piece of tape
to each end of the 2 battens. Using scissors or a razor blade, trim
any tape extending beyond the trailing edge of the kite.
- Cut 2 pieces of Orcon tape about ¼” wide x about ¾”-1” long. Apply
one piece to each of the wing tips at the point where the end caps end.
This will secure the wing tip tabs to the main hem.
- Cut a piece of Orcon tape about ¾” square and apply to the nose of
the kite, this secures the nose of the spine to the kite skin. See
the photo about the way to cut and wrap the nose of the kite with the
tape.


- Cut a piece of Orcon tape about
¼” wide and about 1” long and wrap it around the end of the spine.
- Place the kite face down on the work surface with the nose pointed
toward you. Place ruler across spine near the bow and mark the bow
1-1/4” either side of the spine center or whatever distance your plan
calls for. See the photos for details.


- Put a small piece of paper between
the bow and the kite skin at the point where the bow was just marked.
- Apply a small drop of CA glue on the bow at a point just inside (toward
the spine) of the mark on the bow and slide the “stop” to the mark on
the bow pushing it through the CA glue. Wipe off excess glue. Do the
same on both sides.
- Mark the location on the skin of the kite of the bridle stops. These
marks will guide your soldering iron for making holes in the skin for
the bridle and the tying of the bow and spine together.


Bridling
the Kite
- Wax the entire length of bridle line. Cut a piece of bridle line about
12” long and tie the bow and spine together with it. The knot should
be on the back of the kite. Some fighter kite makers do not tie the bow
to the spine; it’s your option. I always do.

- Cut a piece of bridle line about 12” long. Outside of and next to the
bridle stop on the right side tie one end to the bow. The line must exit
on the front face of the kite through the hole in the kite skin. See
photos for details. Next, tie the other end of the line to the other
side of the bow through the hole in the skin. BUT BEFORE you do, make
sure the loop of line you about to tie, when pulled toward the nose, does
not extend beyond the nose of the kite, then
tie it.

- Cut a piece of bridle line about 24”. Fold over about 3”-4” of line
at one end and tie an overhand knot, making a about a 2”-21/2” loop on
that end of the line. Using a larkshead knot, or a prussik
knot, attach this loop to the loop of line, or yoke, tied to the bow.
- For a 3 point bridle arrangement, tie the remaining end of this second
line to the lower bridle connection point on the spine, based on your
kite plan. HOWEVER, be sure the bridle line, when pulled toward a wingtip,
does not extend beyond the wingtip before you tie the line.
- If you use a 4 point bridle, see
the photos for details.


- Cut a fourth piece of bridle line about 6” long. Fold it in half and
tie an overhand knot tying the loose ends together. Using a larkshead
or prussik knot, attach this 2”-3” loop to the
long bridle line. This loop is the point where you attach your flying
line to the kite.
- Using a small brush, dust with cornstarch all the areas of the kite
that have exposed glue. This removes the stickiness of the glue, so grass
and sand won’t cling to the kite when flying and it won’t stick to other
kites in your kite box.
- Now it’s time to tune this baby
and enjoy flying it!!
Bruce’s Fighter
Kite Tuning Tips
The importance of having a properly tuned fighter kite can not be over
emphasized. Precise tuning makes an amazing difference in the kite’s behavior!
When properly tuned, the kite is actually in your control, and when not
tuned, it behaves as though it has a mind of its own! To maximize your
flying enjoyment of a fighter kite, take the time to learn how to precisely
tune it! If you compete or plan to compete, precise tuning could easily
make a primary difference in your success!
When a fighter kite is properly tuned, its flight direction,
which direction it turns or spins and when it turns or spins, is controlled
by one thing; the variation or change in the tension of the flying line. I think the primary difference between a highly skilled flyer and a new flyer
is simply; the skilled flyer has a higher sensitivity to the small variations
in the flying line tension and therefore will have more predictable and
more precise control of the kite.
Sometimes a newer flyer will not realize that the kite he/she is attempting
to fly is too stiff to fly in the wind at hand. When a kite is too stiff
for the wind, it will be virtually impossible to properly tune in that particular
wind. It will act erratic, and no adjustment will provide much control
over it. It needs to fly in stronger winds! I am not aware of any precise
guide or measure to determine whether a particular kite is properly suited
to a given wind speed, except experience.
FUNDAMENTAL KITE TUNING GOALS:
If your fighter kite will do these two things, you know
it is correctly tuned!
- When you apply strong flying line tension and evenly maintain that
tension, by pulling in or retrieving the flying line, the kite flies
along a straight path in the direction the nose of the kite was pointed
at the time the flying line tension was initially increased. And, as
long as the flying line tension is maintained, the kite will continue
to fly in that straight path.
- The kite begins to spin or turn the moment the
flying line tension is reduced or released, and, during a horizontal
pass in either direction, the nose of the kite will turn upward the
moment the flying line tension is reduced.
That’s it. If a kite responds to flying line tension in this way, the
kite is tuned correctly. Because a fighter kite’s tuning is partially related
to wind conditions you are flying in, each time you fly, you may need to
make minor tuning adjustments. The point is; tuning a fighter kite is not
necessarily a one-time process.
WHEN TUNING A KITE, THERE ARE 3 COMPONENTS TO CONSIDER.
a.
The Bridle. Often the only tuning adjustments
needed are bridle adjustments.
b.
The Spine. The spine must have a slight
bend or curve. Occasionally, the bend or curve in the spine is not the
correct amount or the bend may not be in the correct location along the
spine.
c.
Adding Weight. Adding weight to the nose
or tail of the kite can be very helpful in the tuning process.
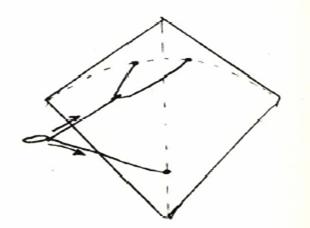
The Bridle, a basic description:

A 3 point bridle attaches to 3 separate points on the kite. And, coincidentally,
consists of 3 bridle parts or legs. There are two tuning adjustments on
a 3 point bridle. (See diagram on last page).
The upper bridle leg; one end of the upper bridle leg is tied to
the kite bow about an inch or so, depending on the kite, on one side of
the spine and the other end of the bridle leg is tied to the bow on the
other side of the spine. The result is a loop of line crossing the spine,
each end of the line is attached to the bow.
The lower bridle leg; one end of the lower bridle leg is connected to the
center of the upper bridle leg using a “larks head” or prussik knot and
the other end is tied to the kite’s spine nearer the tail of the kite.
The 3rd leg of the bridle is the tow connection;
this is where you connect your flying line to the kite. The tow connection
is attached to the lower bridle leg using a “larks head” or prussik knot.
Tuning the Bridle:
Adjusting the bridle requires an understanding of how to “open” and “close”
a larks head knot or prussik knot, I assume you already know how to do this,
if not, there are several good explanations on the web.
What I do; when
tuning the bridle of a kite, I set the tow connection at a point where the
kite very slowly flies forward. This means the tow connection is closer
to the tail of the kite than is ideal, as described in #1 below. Then I
begin adjusting the #2 adjustment described below to get the kite tracking
straight. When I have the kite tracking straight, I then begin moving the
tow connection toward the nose of the kite about 1/8” –1/4”, then fly the
kite and see if it flies as I want. If not, I make another adjustment and
re-test. I repeat this until I have the kite flying as I think it should.
#1. The tow connection adjustment.
a.
Moving the tow connection
toward the nose of the kite causes the kite to have less pull on your flying
line, to spin in wider and wider circles and to be more willing to spin.
b.
Moving the tow connection toward the tail of the kite will
reduce the willingness of the kite to spin, but will spin in a tighter circle,
will cause the kite to pull harder on your flying line, will cause the kite
to fly slower, will enhance the kite’s straight tracking ability and will
make the kite more stable. However, when the tow connection is moved too
close to the tail of the kite, the kite will not fly forward. It may just
hover, or may even try to fly with the tail pointing up instead of the nose!
c.
A balance between the extremes is what normally works best.
This adjustment is quite sensitive.
#2. The Upper Bridle Adjustment.
The upper bridle adjustment is used to get the kite to fly or “track” straight
when you are pulling in flying line. You adjust it by moving the lower
bridle leg “larks head” or prussik knot along the upper bridle leg until
it is at the aerodynamic center of the upper bridle leg. You will know
when it is at the aerodynamic center because the kite will “track” in a
straight path. It won't have a tendency to veer to one side or the other!
a.
For example, if your kite is turning, spinning, veering or
pulling consistently to the right, you would move the lower bridle leg “larks
head” or prussik knot to the left along the upper bridle leg. If the kite
is veering to the left, you would move the “larks head” or prussic knot
to the right.
b.
This is an extremely sensitive adjustment. I suggest moving
the “larks head” or prussic knot 1/64” or less and fly the kite to see if
it is flying straight. If not, then move it again about 1/64” and fly again.
Repeat this until the kite is flying straight.
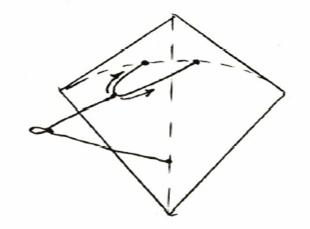
Spine Bend
In order for a fighter kite to properly perform, the spine must have a
slight curve or bend in it (see basic diagram ). The spines in kites I make
are made of bamboo, but they can be of other wood, metal, or carbon fiber.
I like bamboo because it is easy to bend with just your hands; it is strong,
"springy" and lightweight.
The more bend a spine has, means the kite will turn and spin more readily.
If more spin is what you want, increase the amount of bend a little. If
you want a kite that spins less quickly, remove some of the bend in the
spine by bending it a little in the opposite direction of the original bend.
I find the best place for the bend/curve to be located on the spine is
along the entire portion of spine from about 3" below the bow/spine
cross point to the nose. This entire portion of the spine should be slightly
curved.
To check the spine bend in a kite:
a.
Place the kite on a table or other flat surface with the
front face of the kite lying on the surface.
b.
Press the portion of the spine around the lower bridle connection
flat to the surface.
c.
If the bend in the spine
is of the correct amount, the nose of the kite will be elevated above the
flat surface approximately 0.5” to 1”. The actual amount depends somewhat
on the kite design and on your personal flying preferences.
d.
If the bend is insufficient, add a small amount of additional
bend in the spine. NOTE: Bamboo can easily be broken, or damaged, so I
am very careful not to sharply or abruptly bend the spine in any one place.
Instead, I increase the bend a little at many places along the portion
of the spine described above. Sometimes, after increasing the spine bend,
it will need to be increased again. It seems to depend somewhat on humidity,
strength of the spine material and the wind speed you are flying in.
Tuning by Adding Weight
You may find that even with the spine and bridle adjustments; the kite
is still not flying as you want it to. Adding a small amount of weight
may do the trick. Window glazing putty that comes in a roll, or “tacky”
stuff used for sticking pictures to walls, or any other semi sticky putty-like
material will work fine.
Here is what to do:
a.
If you would like to increase the kite’s tendency to spin,
and/or the rate and speed of its spin, add a small amount of putty to the
tail of the kite. Just press some putty onto the backside of the spine
near the tail end of the kite. Use a small amount, about the size of a
pea, fly the kite and notice the changes in the flight. Then either take
some off if you have too much spin, or add a small additional amount until
you have the kite “tuned” to your liking. This may take a few test flights
to get the flight characteristics you want.
b.
If the kite is spinning too much and you want to reduce the
spinning and increase the stability, add a small amount of putty to the
nose of the kite. Press a small amount of putty on to the back of the spine
near or at the nose of the kite. Continue to add small amounts until you
have the kite performing as you want.
I hope you have ear to ear grins pasted to your face every time you
fly fighter kites, I sure do! 
|
|

