
Come back often to get tips and tidbits from people who are building these kites today!
* * * *
Check out Andrew Kinsman's Garbage bag version! It's great!!!
http://members.cox.net/gengvall/circogb.htm
* * * *
I recently edited this page so it contains the latest and greatest methods
for building this kite. The page hadn't changed much since 22 Jan 1991, but
the kite had!
All of the original methods are contained in a Notes section at the very
bottom of the page.
***********************
Send us digital (or digitized) photos of your masterpiece Circo, and we will start a page of kites made from these plans! Gary Engvall; gengvall@cox.net
***********************
A Note from me: These plans were written assuming everyone knew where to buy materials, or least how to find out where to buy materials. Recently, people have attempted to build this kite, but tried to find materials locally. It needs to be pointed out that garment grade ripstop from the fabric store is not the same as kite fabric (spinnaker cloth), and dowels aren't nearly as strong as fiberglass or carbon.
Here are some online resources for materials (in the USA) in alphabetical order:
GOODWINDS KITES
3333 Walingford N., Seattle, WA 98103
shop (206) 632-6151
FAX (206) 633-0301
E-mail: goodwinds@aol.com
Web:
http://www.goodwindskites.com/
HANG 'EM HIGH
1420 Yale Ave., Richmond, VA, 23224
(804) 233-6155 phone/fax
E-mail: tmarvin@erols.com
Web page:
www.citystar.com/hang-em-high
INTO THE WIND
1408-AK Pearl Street, Boulder, CO 80302
800-541-0314.
Good catalog. Call or write them, it's free. Color.
We use it as a dictionary of kites.
E-Mail:
kites@intothewind.com
Web Page:
http://www.intothewind.com/
Kite Studio
Steve Ferrel
5555 Hamilton Boulevard, Wescosville, Pa. 18106
Phone: (610)395-3560
E-mail:
kitestudio@kitebuilder.com
Web page:
http://www.kitebuilder.com/
***********************
Some quick notes before proceeding:
***********************
Materials list:
3 yards of 41" ¾ ounce ripstop nylon. (1/2 yard per panel)
Some extra scrap fabric (six pieces 6" x 4") to make penny weights.
Five 48-inch pieces of 1/8" pultruded Fiberglass rod. (or 1/8" carbon rod)
Five 1/8" i.d. brass ferrules.
71 feet of 50 pound dacron line.
30 pennies for weights.
***********************
Why a 20 foot Circoflex? It makes the best use of the cheapest (by
the yard) fabric.
It can be framed with either 6 pieces of 40" carbon, or 5 pieces of 48"
fiberglass or carbon.
It can be made from a single piece of 54 inch fabric, 6'9" long, cut into
3 pieces 18" wide.
***********************
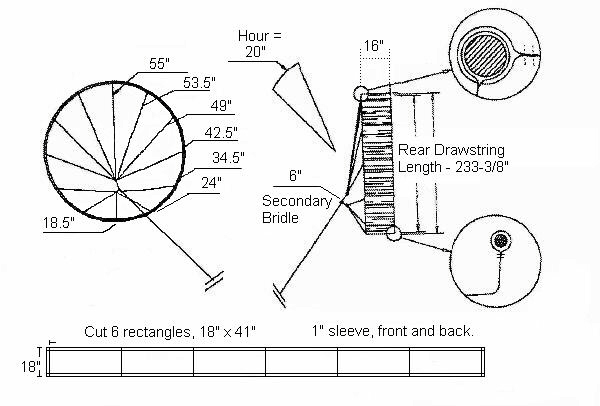
Fabric: Cut 6 pieces, 18" x 41" Make sure the ends are square. 41" allows for a ½ inch seam allowance. The 41" fabric may not be exactly 41" inches long. Panels too long can be cut down, short ones can be allowed for in the seams. The seams need to be 40" apart or the circumference will not be correct.
Sewing: Join panels using a 1/2" Plain Seam. That means to straight-stitch sew a row 1/2" away from the matched-up ends, then fold over the 'flap' of the seam and top-stitch it down. Fold all seams in the same direction, or it will be difficult to insert the stick. Sew all 6 panels together, one at a time, making one long panel 18" wide and 20 feet, 1 inch long. On the good (finished) side, draw lines for the sleeves 1" in from both edges and the entire length of the panel. Crease along these lines. After the lines are marked and creased, sew the ends of the panel together. Make sure the creased sleeves are opened out before sewing the ends together. It is important not to sew the sleeves shut when joining the ends. After the ends are joined, fold on the line, and sew the sleeves closed. The back sleeve for the tension line should be sewn all the way around. The Front sleeve should be sewn leaving 2" open, not sewn, near 6 o'clock.
Fold the sail to find the 12 & 6 o'clock points. Fold again to find 3 and 9. Measure to find the bridle points in between. Punch or burn a small hole (1/8" max) into the sleeve, 3/8" back from the leading edge (fold) at every "hour" on the kite. Cut one slit in the rear sleeve at 6 o'clock. This is where the tension line will be thr3eaded in when ready.
Sticks: Glue a ferrule halfway on each stick (push the stick into the ferrule so that the ferrule is half on, half off. Said another way, push it 3/4" on to the stick.) and put aside to dry while you make the weights.
Make the weights: For each weight, take a piece of fabric 6" x 4". Fold in half the long way, so it is now 2" by 6". Straight stitch a row of stiches 1/2" away from the fold, parallel to the fold. Pick and end and straight stitch a row of stitches 1/2" in. Measure in another 7/8" and sew another line. Measure in another 7/8" and sew another line. Repeat until there are 5 spaces, 7/8" wide. These are the sleeves for the pennies. Push a penny into each sleeve. After the pennies are inserted in the sleeves, sew the sleeves closed by sewing as close to the pennies as possible. I usually just put the edge of the Presser Foot against the pennies and off-set the needle towards the pennies and that is close enough. Then trim so that there is 1/2" all the way around the pennies.
Sew the weights, evenly spaced between 5 & 7 o'clock, about 2" towards the back of the kite from the front edge of the front sleeve. Hint: 6 weights = 5 spaces = 8 inches on center, for a 20 foot sail.) Note: Penny weights may be sewn in perpendicular to the leading edge of the sail. However, when I cut kits for Circoflex making workshops, I cut two pieces of fabric approximately 6" by 41". I encourage people to turn one of those pieces in to one long sleeve parallel to the leading edge and place their weights creatively, but the same way on each side of the middle.
Make a tension line by tying an overhand loop and then putting a mark in the line 233-3/8" from the end of the loop. Cut it about 5 inches longer. Thread it thru the rear sleeve by Lark's'ing it to a fid (6 inch long ¼ inch dowel with a hole cross-drilled in it.) Pull out the loose end, thread it thru the loop, pull to mark, and tie off. Pull all excess back into sleeve.
FRAME: It is easier to bridle the kite with the frame installed. Insert the frame in to the front sleeve, the one with the bridle tied to it.
Bridle: First make (measure, mark and cut) one each of the 12 o'clock and 6 o'clock bridles: The 12 o'clock has a finished dimension of 55". Cut a line 65-3/4 inches long, put a mark 5" in from each end. Marks should be 55-3/4" apart. Insert one end of the line in to the kite at the 12 o'clock position. Bend at the mark that is 5 inches in from the end. Tie and Overhand Loop, pulling the rest of the lenght of the string thru the knot. The mark in the line should end up at the apex of the loop, right at the hole in the kite. After this Overhand Loop is complete and correct, locate the other end of the line, bend at the mark, tie an Overhand Loop. The beauty of this is that no matter where the knot itself ends up, the line is the exact length it needs to be if it was bent on the marks. The knot soaks up the same amoun of string no matter where it lands.
I find it easiest to start at 12 o'clock, then do 1 & 11 o'clock, then 2 & 10, etc.
The 6 o'clock has a finished length of 18.5. Cut a string 29-1/4 inches long. Mark 5" in from each end, marks should be 19-1/4" apart.
|
 |
There should now be a bridle leg at every "hour" of the kite.
Take the Secondary Bridle, which is a string 16" long and marked 5" in from each end. Thread one end thru the 6 o'clock, then the 5 & 7 o'clock, then the 4 & 8 o'clock bridle legs. Adjust so the mark on the Secondary Bridle is just showing away from the loops, and tie closed with several half hitches.
Take the other end of the Secondary Bridle and thread it thru first the 12 o'clock bridle leg, then the 1 & 11 o'clock, then the 2 & 10 o'clock, then the 3 & 9 o'clock. Adjust so the mark on the Secondary Bridle is just showing away from the loops, and tie closed with several half hitches.
Last thing: Make a knotted loop by taking 12" of string and tying it closed
with an Overhand Knot. (A Figure of 8 Knot is better if you know
how to tie it.)
Lark's Head (actually, a Prussik Knot is better to use if you know how
to tie it) it to the Secondary Bridle. I fly mine close to the bottom.
Note: Rear Tension Line: By using the dimension in the table, cut a line
243 and 3/4 inches long, put a mark 5" in from each end. Fold one end at
the mark and tie an Overhand Loop. Thread all the way thru the rear sleeve.
Insert the other end in to the Overhand Loop and pull to mark. Secure with
several Half Hitches.
Note: The relationship of bridle to kite is linear. These values are scalable. For a kite twice the size, double these values. This factor should be applied to the Finished Length of the bridle, the circunference, the depth, the amount of weight, and the thickness of the leading edge spar. Notice above, the Cut Length is (almost) always 10-3/4" longer than the Finished Length. Here's why: Each Overhand Loop soaks up 3/8" of string to tie it. Each Overhand Loop requires 5" of string to be bent over and tied in to a loop.
SCALING UP THE KITE:
Trevor Hughes sent me an e-mail to let me know that if the dimensions of
the kite are doubled, the area of the kite is quadrupled and the weights
should be quadrupled also.
It should also be noted that the cross-section of the frame (Area, not Diamater)
is also a function of square. This means that if the diameter is doubled,
the area of a cross-section is quadrupled. Said another way, it takes 4 times
as much material to make a 2" rod than it does a 1" rod.
Lark's Head: http://www.netg.se/~jan/knopar/english/larkhuvu.htm
Prussik Knot: http://brmrg.med.virginia.edu/knots/prussik.html
Original kite design by Ton Oostveen. Picture by Ton Oostveen. Dimensions are adapted from a table by Mike Dallmer. Original drawing may be viewed at http://www.sct.gu.edu.au/~anthony/kites/circoflex/original/fig1.jpg.
Anthony Thyssen's Circoflex web site: http://www.sct.gu.edu.au/~anthony/kites/circoflex/
***********************
NOTES:
***********************
6 curtain weights (lead square in fabric or plastic cover, approx. 1"x1"x1/16") can be used instead of pennies.
Note: The curtain weights should add up to about 3 ounces. Some weights are smaller. Weights we bought on the west coast were half the weight, took 12 weights for proper ballast. Your mileage may vary. Check your weights with a scale. Use whatever number add up to about 3 ounces, and space them evenly between 5 o'clock & 7 o'clock.
Another weight note: It has been pointed out that Curtain Weights can be expensive ($1.49 for four of them) and the same effect can be achieved with 25 to 30 pennies. At the last Circoflex Workshop, we had people sew slotted sleeves to hold 5 pennies each, and we used 6 of them.
Yet another note: This one about the frame: The carbon rods are 1/8", just like the fiberglass. At the time of the original writing of this page, carbon was only available in 40" lengths. Now it is available in 48" lengths. Use whatever length is easier (or cheaper - and don't forget the extra ferrule) to use for you.
Notes from Treasure Island Sport Kite Klub workshop, January 20, 2001. Don Teeter, a Hoosier Kitefliers Society member from Ohio, had a great idea for improving the ease of building the kite, and the ease of removing and replacing the sticks. Instead of cutting, sewing, and attaching tabs on the sleeve, Don suggests punching small holes in the sleeve and tying the bridle thru them. There is enough space between the holes and the front of the sleeve to keep the bridle in place and put the sticks in.
Don also made a silver mylar version that is the same diameter of these plans, but 8 feet deep. It looks like a big silver can in the sky.
Don also suggested making square fabric pouches for the curtain weights (or coins for weight). Some curtain weights come in plastic sleeves that loosen up over time. They last longer in a sewn pouch.
***********************
Notes from AKA workshop, Oct 8, '99:
Ed Spencer mentioned that people experience problems with brass ferrules
breaking. Putting a flat taper on the ends of the rods spreads the stress,
and the bending stress is born by the taper instead of the ferrule. Remember
that this will reduce the length of the stick by the length of the taper.
***********************
Note from Jim Martin Jr., of the WACKOS: Be very careful and pay strict attention when joining together the ends of the Circo. It is very important not to twist it into a Moibus strip, nor have it wound thru the legs of the dining room table when sewing together.
***********************
Note: These plans call for 'slits' to be cut into the leading edge sleeve. This is easy, and optional. If it is desired to make the leading edge stick easy to remove, then sew an extra row of stitches 3/8" back from the leading edge fold. This makes a sleeve big enough for the 1/8" stick and the external ferrules. Tabs can be sewn in place of the slits. Be careful not to sew thru the sleeve for the leading edge stick when sewing the tabs to the kite. Tabs are sewn *behind* the 3/8 sleeve just sewn.
***********************
Note: The Bridle Table does not allow for Lark's Heads around the leading edge spar. If Lark's Head knots are to be used, add 3/4" to the Finished Length dimensions. No change in bridle length needs to be made if using the 'extra' sleeve and tabs.
Note: If using the 'extra' sleeve and tabs, it can be difficult to persuade the stick to go thru the sleeve. Putting a vinyl end cap over the end of the stick makes it much easier. Also, if using tabs, it is easiest to tie the kite end of each bridle leg to the kite first, using an Overhand Knot, then tying the Overhand in the other end of the bridle leg.