E-Mail:
Bob Harris
harris@bhc.com
Jennifer Snyder
snyder@bhc.com
Froggy's Kite Class Centipede Kite


Dermer's Dragon
By Richard Dermer
AKA Kiting Volume 20, No.2 March/April 1998
For a summer library program a few years back, Marti and I were asked if we could build a Chinese dragon kite with the kids' help. We did, and you can too. Here's how:
For really easy construction, use Styrofoam picnic plates for the lifting discs. To these, we glued 30" "outrigger" sticks across the center of the concave sides of the plates, using a hot glue gun to tack the sticks to lips of the plate on both sides. We then glued a second stick, 1 inch longer than the plate's width, across the concave side again at a right angle to the outrigger. Flush at the bottom, the one inch projecting at the top gives an attachment point for the top link line. For these sticks, we used matchstick bamboo from a window blind, but 1/8" dowels could also be used.
We pre-built a bunch of these cells and passed them out for the kids to decorate with magic markers. Pick a theme if you want, but make it easy. After decorating, we had the kids attach tassels of Christmas tinsel to the ends of the outriggers with Scotch tape. Better pre-make these tassels, too, to insure uniformity. For more precise balancing, although we didn't find it necessary here, each disc can be suspended from the top center stob (sic) and carefully balanced horizonally by trimming small amounts of tassel from the heavier end, if any.
To link the cells together, we prestretched three lines of 100 lb. braided Dacron in the back yard, got them evenly tensioned, and marked all three lines, with a felt tipped pen, at 18" intervals. (I've since learned that I could have gotten by with closer spacing—1.5 times the diameter of the disc is sufficient.)
Note: You must use Dacron or Spectra line to eliminate stretch—Nylon is too stretchy and will be unworkable.
After the kids decorated and tasselled their discs, we tied all three link lines to a doorknob, left about five feet of extra marked line for the head and bridle, and started attaching the lines, with larkshead knots on each marked spot, to the two outriggers and the top stob (sic) of each disc. The decorated convex side faces the front; the sticks are on the back concave side. Note: It helps to have a large room or hallway to do this in. The larkshead knots will take some time, particularly slipping them over the tasseled outriggers and then pulling them tight on the mark next to the plate. It helps to have lots of hands—three pairs doing the knots from front to back, and others holding up the kite and lines as needed. After making sure that the knots are on their marks and pulled tight, put a spot of quick-drying glue on each so it won't slip.
Once all the cells were strung together, we attached the head. This was a flat, colorful design the librarian had made of paper and had laminated. We stiffened the back with multiple bamboo sticks and scotch tape, and then poked three holes in the head—spaced just like the attachment points on the cells. We made sure we had strong bamboo crossing over these holes, tied the three link lines, (now off the doorknob), to the bamboo on the front set of marks, and passed them through the head to the front of the kite. We then tied them together about three feet in front of the head, (long bridles are better than short), making sure that the side lines were even and the top line just a little shorter— enough to tilt the head and discs about 15 degrees forward in flight. This bridle angle may require some experimentation—we got lucky first try.
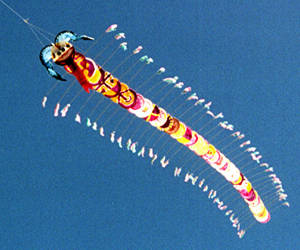
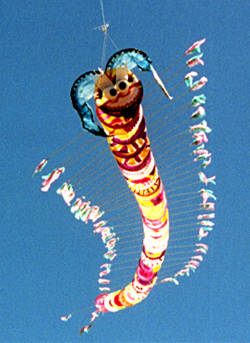
That was it. We got about a dozen kids to help transport the whole thing, stretched out, out the door and down a sidewalk to a big open flying field. I attached a 100 lb. flying line to the bridle tow point, backed up so l had about 50' of line to the head of the dragon downwind, and had all the kids, with the kite stretched out tight, let go simultaneously. Up it went! 44 cells, plus head, made it 68' long, and it flew great, sinously (sic) snaking back and forth. The outrigger tassels shimmered in the sun, and the kids loved it!
One problem with this kite was its bulkiness on the ground. The outrigger sticks prevent the plates from nestling, so it was about 30"x10"x48" in its most compact form, and that could be only be maintained by careful! handling and bundling. We left it with the librarian—last saw it stretched out hanging from the ceiling inside. (It's a big library.)
Before doing this workshop, we had made a prototype to make sure it worked. The first one had only 12 undecorated plates and no head. While a flat head such as we used can furnish additional lift, the traditional 3-D head on a dragon is for looks, not for aerodynamics. The bigger such a head, the more cells you need to lift it.
Try this! It's cheap, easy, and showy. Our unadorned prototype won "most unusual" at the Zilker Park festival in Austin, Texas.
Notes from Jennifer Snyder - AKA Froggy - Summer 1999
"I tried this recipe with the kids kite class and won "Best Kite" at the Dance Palace Day Camp, Point Reyes Station, California.
Excellent kite for kids. There were15 kids and each painted 3 plates with bright tempra. I gave them 3 color choices and they had free reign with their designs. The colors coordinated the designs and created a wonderful effect. We used feathers at the ends of the horizontal sitcks that were also color coordinated and helped to complete the effect of a beautifully designed kite. The kids were completely thrilled when it flew our first try. Great success! Thanks a bunch Richard and Marti."