- Lighter, Brighter, Runs Longer Flashing LED
Only to be made for private use!
While in a kite shop recently I noticed
KITE LIGHTS for sale.
Knowing full well that there are definitely not
enough hours in the day for flying, I decided to buy the lights and get
some “kite overtime“.
I found I loved night flying. But the lights I
had purchased fell way short of my expectations!
They were
not bright enough. They weighed too much and went flat way too
quick!.
This is my
The parts you
will need to make one flash unit are:
-
Button cell battery 2032 (3volt lithium)
-
PCB mount Button cell holder to suit above
-
100 uf 6 volt, 6mm x 7mm high (electrolytic or tantalum capacitor) (substitute 300uf for a slower flash)
-
LM 3909 IC (led flasher oscillator)
-
One ultra bright 5mm LED (= or > 3000mcd more mcd is better)
-
Spar Grip
-
Screw


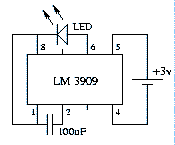
The idea is to build this circuit onto the back of the battery holder and mount it to the kite frame with the spar grip.

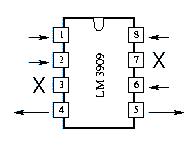
Have a look at the 3909 you will notice the notch on one end and a dimple over pin 1

This piccy
will show you the pin numbering and orientation
The first thing to do is remove pins 3
and 7
(they
can’t cause confusion now)
Carefully
straighten out pins 4 and 5
Wrap pins 1,2,6 and 8
under
Pins
1 and 8 will be soldered together.


Now take the battery holder flip it over and bend the two pins inward toward each other and drill the hole for the screw. Note the new hole position in piccy’s 3 and 4


Next we trim and shape the legs on the capacitor before soldering it to pins 1 and 2 of the chip.


Note the negative leg has a marked stripe down the side of the can and the leg will be shorter.
The negative leg goes to pin 1
The positive goes to pin 2
Fit the LED to pins 6 and 8
The short LED leg (cathode) goes to pin 8
The long LED leg (anode) goes to pin 6
Now is a good time to ensure that pins 1 and 8 are soldered together as well.


Now fit the newly created flasher unit to the battery holder.
Pin 5 solders directly onto the positive terminal (the end with the square poking out).
Pin 4 to the Negative. Note the layout so as to leave room for the spar grip to mount via the hole you drilled.


Now is the time to face the LED in the right direction.
You might find you need to shorten the led legs.
I try to have the led sit just above the top rim of the battery holder. It makes for a more solid device.
The leg length will only be a mystery on the first device you make.
Now screw on spar grip and fit a battery.

I slip a piece of stiff plastic between the positive battery top and the battery holder terminal to act as a switch.
It’s far less trouble to leave the battery in place than to remove it for storage between fly’s.
All that’s left to do now is cover the electronics with some sealant (sikaflex. Silastic or similar goo type bonding compound).
The battery will power the flashing LED non stop 24 hrs per day for at least seven days.
I have chained 10 LED’s together and run them from this one simple circuit and they flashed brightly for approx a week also.
Some of the more exotic LEDS ie blue or green 4volt 7000-8000 mcd type’s won’t run from this configuration.
The only change you need to make is to use a twin battery holder (takes two 3volt button cells resulting in 6 volts to the chip).


I have
found the fast flash rate best suited to the dual line stunt kites, the
faster kites tended to travel too far between flashes when using slower
flash rates.
Don’t
be tempted to buy the cheap LED’s, A cheap 55cent LED is usually around
18-80 mcd LED’s rated at 3000 to 9000 mcd can be seen for miles expect to
pay $1-$3 each depending on color and mcd (brightness). These lights are
not intended to illuminate the kite sail but rather to look pretty and aid
in tracking the kite.